
Farmer flocks
Farmer flocks in the free-range industry has once again placed many hens back into laying eggs in nests rather than in cages. However this caused the re-emergence of some of the problems which were the cause of the development of the cages. These are the increased labour of egg collection, increased time taken to clean the nests, more soiled eggs, and an increase in broody birds.
The production of poultry or eggs is the motivation for your enterprise and so anything, which causes a reduction of the number of eggs available for productive use, reduces the viability of the enterprise.
Lets look at some productive farmer flock tips below.
Nesting
The development of the free-range industry has once again placed many hens back into laying eggs in nests rather than in cages. However this caused the re-emergence of some of the problems which were the cause of the development of the cages. These are the increased labour of egg collection, increased time taken to clean the nests, more soiled eggs, and an increase in broody birds.
The production of eggs is the motivation for our enterprise and so anything, which causes a reduction of the number of eggs available for productive use, reduces the viability of the enterprise.
This paper is intended to provide some guidance to those planning to build nesting systems. The material is not intended to be absolutely definitive but to help with an understanding of the remaining wild characteristics of the bird and most effectively harness these biological drives to produce the best effect. This is not a scientific text with cross-references, it is merely a guide.
In past times, nests have been primarily of two types. The first type was a community nest box – all the birds have access to the same area to lay. These nest boxes were designed for 10 to 20 birds and contained litter. The system was ideal for small numbers of birds with a stable pecking order and for many operators these were an ideal structure. However, as the industry developed, numbers increased and the more aggressive strains of bird were selected because they laid more eggs. As a result, the occurrence of cannibalism and egg eating increased. In addition, the number of birds per colony, as well as the overall size of the colony increased. Due to this, population pressures became more prevalent.
In order to try to combat these problems, the individual compartment nest box with an absorbent material (litter) inside, became the standard. This increased the labour, and reduced the operator’s access to the eggs, but it also reduced cannibalism by increasing the level of privacy for the birds. Nests in this system needed to be very specific in size for each type of bird. If the nest is a little too large, then two birds would try to use one nest, a little too small and they would discourage use and increase floor eggs. Also, larger numbers of birds placing more pressure on the ranging area around the houses causing the level of dirty feet of the birds to increase, as does the level of dirty eggs increase. To remove some of the dirt from the chicken’s feet, slat floors are used. However, these tend to make access to the nests more difficult for egg collection. Wire floors in nests reduce the labour of removing litter, and allow the eggs to roll out easier collection. It was in this way that nesting cages came into the spotlight. Some of the old techniques are being combined with the new to allow the nests to be kept clean, while also giving the birds in the nests free-range access.
Factors affecting nest design:
1. Biological drives
2. Population pressure
3. Light ratio
4. Comfort levels
To properly design nests, we need to understand the biological pressures which drive the bird to a) use the nest and b) select a particular nest site.
The reasons why the bird uses a nest are two-fold.
Reason one is the desire to lay eggs. Egg production is a combination of correct diet, correct age, and the production of light stimulated hormones that trigger the maturation of the egg follicles, and subsequent development of complete eggs. Good management prior to egg production will regulate body weight, lighting, and nutrient consumption, ensuring the maximum egg yield from this hormone production, and subsequently maximum number of nest visits. Consequently, the design of our nests is vital to maximize the desire to lay in nests, minimizing floor eggs.
Reason two is for brooding the eggs to hatch them. This is the result of another hormone that causes the bird to cease laying and to want to sit in the nest and try to hatch the eggs. This is a factor we try to minimize as much as possible. A bird which ceases to lay and becomes established in the brooding process will cease laying for up to 3 months and will usually become uneconomic in the process. In addition this bird will increase the contamination of the nests, and greatly increase the work involved in keeping the eggs clean or cleaning the eggs. The main variation in the tendency to broodiness is genetic, so selection of non-broody strains is important. However temperature in the nest and total time in the nest appear to be additional factors. Increased nest temperature appears to increase the rate of broodiness, so designing good ventilation is advantageous. In addition, if the bird can spend long periods in the nest, either during the onset of broodiness or overnight, and this appears to have a significant effect on the number of birds which proceed on to full broodiness. Interruption of the time in the nest, both at night and during the day seems to reduce the development of full broodiness and the birds continue laying.
There is no conclusive answer as to why the bird chooses the nesting site. The most compelling drives in selection of a nest site is habit and privacy. The bird will select the most secluded, remote location with the best chance of hiding the eggs from predators. This also seems to best explain the cackling after laying an egg. The bird lays the egg, waits until a time when all seems clear, then leaves the nest in a hurry, emitting a warning call as she runs away, hoping that predators will be looking at where she is going, not where she has been.
Another factor to keep in mind is the community influence that seems strong, particularly at the onset of lay. The bird will tend to lay where another has already laid. This seems to be community wisdom: if another hen has laid an egg there then it must be a good place for another. This is of value to us, in that we can use false eggs to establish the habit of correct use of the nest boxes using the community wisdom. However, as a management factor, the poultry man must ensure eggs placed in undesirable locations do not remain there for very long, removing any unwanted behaviour – the laying of floor eggs, for example. An interesting study of nesting systems showed that some systems actually seemed to have the birds lay more eggs than other systems.
This appears illogical, at first. However it seems that some systems ensure all the laid eggs are retained in the nesting systems, and few are laid as floor eggs. These are subsequently eaten or broken and are not even counted. Consequently, total egg count is an important comparative measure, as well as percentage of floor eggs.
The next factor in selection of nests is comparative light levels or ratios. The darker the nest in comparison with the rest of the house, the better the use of the nest. This can be achieved by a variety of different methods. The important factor here is the ratio between the light and the dark, not the absolute dark. For instance, in small houses we have always placed the nests in the front wall below the main wire open area. This meant that when the fowl is standing in the back of the house and facing forward the iris in the bird’s eye will contract and, because the bird is looking at the light, the nest appears dark. The bird tends to use the dark spot. However if the nest is in the rear of the house and the light comes over the bird’s shoulders as it looks toward the nest, the nest appears lighter and the birds tend to seek out the darker corners for floor eggs. This effect is also noticed with lighting in sheds. The position of the lighting effects the shadows in the house. If the nest entrances are in shadow, their use increases. If the lights are placed wrongly and shine into the nests, or create shadows elsewhere, the use of the shadows for nesting will increase.
How else can we achieve increased difference (ratio) between light and dark? Make the inside of the nests black – although this is often not practical and can be a detriment to the heat aspect, or paint the inside of the house white. In some houses the use of white slats, either plastic or wood, increases the amount of light floor area compared with the darker interior of the nests. Careful attention to the height and position of artificial lights and windows can also provide useful return benefits.
The last consideration seems to be comfort levels. Included with comfort levels are the following features:
1. Ability to carry out nesting behaviour. As a part of the pre-egg laying, the birds tend to work the nest site by digging and forming it. Wire floors discourage this activity, and therefore we assume would also discourage nest use compared with litter floors elsewhere. In contrast, litter in a nest allows this behaviour but thus increases the cost of cleaning. AstroTurf ® on a wire base provides a springy surface which allows this behaviour, and also has the effect of cleaning the bird’s feet. There is also the potential for the floor to be sloped and so allow the eggs to roll out. Moulded plastic nest bases also seem to provide this effect. Mostly, we look for nest material which is cheap, soft, and easy to clean out. We also look for nest boxes to be warm, dry, and draught free. All these features are excellent incentives for use of the nest, however they all have significant detractors, in terms of what we do not want in a nest. Draft free, warm areas are ideal for broodiness, which we want to discourage. Warm litter is an ideal place for parasites to be harboured, and litter costs money to put in and take out. In addition, all the automatic collection litter systems are more expensive.
2. Temperature and ventilation. These are important as a certain warm feel, particularly in winter, encourages nest use; overly warm nests encourage broodiness, and over temperature will stress the birds. However excess ventilation will make the nest uncomfortable.
3. Space has already been mentioned, but it applies in this section as well. Nests too small prevent the above behaviour, increase the temperature problems and make the nest cramped and thus, less attractive. In colony systems with a large number of hens per nest, overcrowding increases the cannibalism pressure once again.
Please note these are not absolutes, but increase or decrease the pressure for the bird to act a certain way. As poultry managers select the maximum number of “natural” pressures to achieve our aims.
So to summarise, here is a list of the desirable characteristics to have and the features to avoid.
Ideally the nest will have:
• Minimise cost and labour for collection of eggs
• Ensure the eggs remain manure free
• Discourage broodiness
• Minimise parasites
• Minimise cannibalism
• Maximise use by the birds.
• Encourage use, minimising floor eggs and losses
• Use no supplies such as litter and
• Cost a minimum, if anything, to make.
Avoid nests that:
• Are expensive to construct and maintain (must be balanced against labour savings and egg yield)
• Result in dirty eggs
• Encourage broodiness
• Encourage parasites and
• Discourage use.
Here are some design comparisons. This will allow evaluation of potential designs compared with the needs of the particular production situation. I must stress this is a very biased view, based on what I have seen, heard and read about the systems in operation. As I have not seen all the systems in action around the country, and I don’t know everything, I am sure I will miss some good systems. Please use this information to promote discussion, thought, and experimentation, rather than as the final word on this topic.
1. Basic nest
This describes a nest box which is literally a box. Fruit boxes, detergent drums cut in half, waxed cardboard boxes, and similar structures are the simplest nests. They usually are on the floor or a very simple stand. They are adequate for small numbers of birds but have severe limitations when considering the design features previously discussed. In general, basic nests will be litter nests requiring regular cleaning, will not be specific sizes for the birds, will lack the privacy, and not have effective light ratios, so will tend to be systems where there are more floor eggs. Whole black detergent drums with one open end tend to overcome some of the light and privacy issues but tend to be too large for single birds and encourage two birds in a nest with egg breakage issues to follow. Broodiness is addressed by the egg collector who should notice by the actions of the birds if broodiness is commencing. Manual removal of the bird from the nest, or the bird from the house can then occur.
2. Basic nest with stands
These help move the nest to a more convenient height for egg collection and so reduce the labour of collection, but increase the price of construction. At the time that nests stands starts to become necessary to reduce the labour costs and difficulties, the availability of large quantities of recyclable material for construction become limiting. Waxed cardboard nests are low cost and can resolve some of these questions, but with an increase of cost, and relatively short life.
Some difficulty occurs is restricting night access to these nests as birds sleeping in the nests, particularly prior to broodiness, increases the level of manure in the nest and in turn, the level of soiled eggs.
3. Colony nests
Colony nests are low cost, as many of the sub-dividers for individual compartments are not needed. If the population is quite stable, and of a non- cannibalistic breeds, these can be quite successful. Also the larger size allows the nest to be made so the light ratio can be addressed. The darkness of the nest sometimes also helps the cannibalism issue. However, a large number of eggs in a group allows a greater incidence of soiled eggs, and the greater probability of egg damage, egg eating and so eggs lost to the system. These colonies need more frequent egg collection. Acceptance of use seems also to be good with dark colony nests, perhaps the community effect also helping. Attention needs to be paid to removal of all birds at night.
4. Basic nests in timber or sheet metal constructed to suit
This is an attempt to standardise a nest to overcome some of the recycled materials, and simple nest limitations. Subject to mite infestations. Nests compartments of specific size related to the breed of bird attempt to ensure the individual bird has its own compartment, and limit cannibalism and squabbling over the nest space. The issue of light ratio can also be addressed, while allowing greater possibilities for limiting height access, by increasing the cost of the materials.
5. Basic nests or colony nests with stands and some slats
These start to address the question of the dirty feet, but if a reasonable amount of slat is used, i.e. more than about 300mm wide, a disadvantage starts to appear in the limitation of the ability to reach to the nests for collection. Slats can be timber, plastic or wire. Timber, spaced correctly, will clean the feed well and if painted white will increase the house/nest light ratio. Timber is however harder to clean, and can harbour red mite. Wire must be carefully selected to ensure foot damage is avoided but is very effective a foot cleaning. Plastic slats have minimal structure, correct colouration, provide excellent cleaning of the feet, and are easy to remove for the end of the batch, but cost more. Slats used in breeder operations need to have about 600 to 900 mm of slats to provide effective feet cleaning. The collection problem can be reduced if the eggs can be collected from the back of the nests, but this may also means that the birds have access to the nests from the back thus negating some of the value of the slat. Building the nests into a wall and allow egg collection from the outside addresses both these issues, but increases the cost and difficulty of cleaning and litter removal. Some difficulty is posed with ensuring the nests are closed off at night with basic nests. Some systems use flip up slats as a lock up on the front to restrict night access.
Examples of SKA-slats and Grinta slats (external website).
6. Replacement of litter
Reduction of cleaning costs by removing litter and replacement with alternative floor materials has been tackled by several systems. The most prominent are wire floors, plastic nest bowls, and AstroTurf ® floors. Wire has unfortunate implications in cages and is therefore somewhat undesirable, though it does allow low cost rollaway systems. AstroTurf ® has a number of advantages, especially the perforated types as they allow sufficient airflow to dry any remaining manure, which has been rubbed off the feet during the nesting behaviour. Plastic nest bowls also appear to be able to perform this task. These systems are addressing many of the difficulties of nest design but at increasing cost per bird housed. The nest can be more enclosed as the need for access for regular litter replacement is removed. If night access is also restricted then the incidence of soiled eggs can be reduced to almost none.
7. Removal of the eggs from the birds
The development of litter alternatives means that rollaway systems which take the eggs away from the birds as soon as they are laid, can be developed. This has the advantages of reducing the possibility of breakage and loss, reducing visual cues to trigger broodiness, reducing the possibility of egg soiling, and increasing the efficiency of collection. All the eggs are in one place and can be collected without disturbing the birds unduly. Disadvantages are the increased cost of building, and the need to provide some additional visual cues during the onset of lay. False nest eggs help with the onset of lay.
8. Comparison of colony and single bird nest in rollaway structure
Now that rollaway structures are feasible, what are the strengths and weaknesses of the colony, that is one nest compartment 2 or more metres long and .3 metres wide compared with individual compartments say .25 m x .3 m same total numbers per total nest space, assuming similar amounts of slat and similar lighting conditions in the house?
The colony nest will tend to be darker, and this plus the community effect will result in a higher use rate. The single nest will be more open and so more subject to light entry from the house reducing use rate. The colony has less components, so lower manufacturing cost. The colony has fewer parts to clean, and creative construction will mean less time to remove the parts for cleaning compared to single compartment nests. The darkness and enclosed nature of the colony will tend to increase broodiness compared with single nests. However the colony can have simple ejectors compared with single nests.
I do not really think there is an ideal nest system, though some of the commercial mass-produced systems are starting to come close. The following is an evaluation of features found in many commercial systems without naming the systems.
Colony systems with compartment sizes about 2.4m x .3m are now the trend as these have a lower component costs and are easier to dismantle for cleaning. The colony systems are also easier to darken usually having flaps over the access areas without limiting the access. Some of the colony systems feature ventilation chimneys to reduce internal temperatures. Other colony systems use timber instead of steel for the structure.
Virtually all the colony systems use AstroTurf ® nest pad material, sitting on a springy wire frame. When the bird engages in nesting behaviour, the spring of the frame ensures any eggs still in the nest roll out to collection, but with a minimum slope on the floor of the nest. Some of the steel systems use 2 tiers high to allow higher density and the rollaway systems allow most systems to be back to back in the centre of the houses rather than along the wall. Egg collection is with a centre belt which carries the eggs to the collection point either with a manual crank or motor drive.
Automatic night time bird ejectors prevent birds from sleeping in the nests, and save the task of manually closing nest doors after first checking all birds are out of the nest. Night soiling is eliminated, and broodiness reduced.
A number of single compartment systems use AstroTurf® or plastic bowl floors, with rollaway for egg collection. In single or double tiers, these systems are still popular for very small flocks, or flocks with cannibalism problems. The higher cost of a lot of small components is the main disadvantage with larger installations.
Slats: All the major manufacturers now recommend slats at the front of the nest with recommendations from .6 metres to 2.4 metres wide. This also takes into account drinker and feeder systems.
Poultry Signals books
Egg washing considerations
One of the most common egg farming questions which is asked is concerning egg washing – To wash or not to wash, this is the question.
Broadly the world is divided into four zones:
1. Europe where egg washing is not permitted
2. America where egg washing is mandatory
3. Australia where we can’t make up our minds, and
4. The rest of the world who don’t care.
The above analysis is oversimplified however Bellsouth is in the washing group.
In a pure world, there would never be any fecal marks on an egg, the nests would always be spotlessly clean, no pullets would ever leave blood stains on the eggs, Salmonella would be nonexistent pigs would fly, and we would never need to clean an egg.
In the real world, eggs need some degree of washing, or as we would prefer to call it, sanitising. That is a minor stain, manure mark, dust, and surface bacteria are removed.
There are two different sorts of washing:
1. Recirculated washing machines use the same batch of water and pump it over the eggs. The problems in this type of machine are many:
i. The water quickly becomes dirtied with organic material from the eggs. This uses up the chlorine, leaving the water as a contaminant rather than a cleaner.
ii. The used up chlorine makes the water harder, making the chlorine that’s left in the reservoir less effective.
iii. The calcium from the egg shells washes into the water reservoir also altering the water chemistry and so reducing the availability of the chlorine.
iv. The constantly changing chlorine levels need to be monitored to ensure there is still active” or “free “chlorine available to act on any fresh organic matter.
v. The chlorine often now gets very frothy so anti froth is added.
vi. With all this going on the pump keeps on pumping the water from the reservoir onto the eggs, and making them dirty again. The eggs then must be rinsed with water to remove any trace of the chemical brew that is in the reservoir. Then another lot of fresh water is sprayed over the eggs with a high level of chlorine (minimum 100 PPM) to ensure that any bacteria in the wash water has been negated. Theoretically the egg is sterile from the disinfectant which is very carefully managed. (I am looking out the window for the flying pigs again). Some exceptions are required by different jurisdictions, one state requires another rise to remove any disinfectant residual.
So there is a big list of why not to wash.
2. The other sort of machine is the one use water washer. It is usually used by smaller operations. These machines pump a low flow of fresh water onto the eggs, after mixing with a controlled amount of chlorine or Quat. This is unused potable water. The water spray bar is a minimum of 500mm long. The fresh water (called the wash water) flows over the eggs, at a lower level of chlorine. The eggs travel along and the drip bar then provides more fresh water with chlorine which is the rinse. All the water is removed off the eggs with fine nylon brushes and air flow so the eggs emerge from the machine almost dry. The water is now drained away as waste.
I was pleased heart that at a recent trade conference sponsored by the WPSA, discussion was had on this topic, and that Margaret Sexton, in response to a question, agreed that there was no further rinsing required after the use of a non-recycled water rinse in this style machine.
As a side note, there is nothing that will convert a black egg, that is an egg which has been covered in manure and is on the floor, can be recovered and turned into an A grade market egg.. So please don’t try. Likewise with cracked eggs.
Lastly, in the editorial of the Poultry World Digest a couple of years ago, the editor was discussing the issue of Salmonella bacteria on farms. In Europe, the control of problem eggs is by certifying that the farms are salmonella free. His statement was the only farms which test salmonella free are those where they did not test enough.
There are also some new techniques for sanitising eggs, UV sterilisers are among the newest. But UV only works when the UV rays contact the DNA of the bacteria. They don’t address the cleanliness of the eggs, and the UV cannot penetrate a lump of fecal matter to get to the bacteria. Great for physically clean eggs.
So best to use management systems which ensure the eggs are clean to start with, good nests, where no birds can sleep, with good cyclical cleaning programs to ensure they stay clean, cleaning programs for egg conveyors, clean hands of the staff, clean graders.
In summary, in the real world, with all the best management, I think that a correctly installed, properly cleaned and maintained Single water use washer ticks all the boxes and is the best way of sanitising eggs.
More on egg washers
Rule of Thumb – Egg washing solution for Sanitouch egg washing machines
Your Sanitouch is unusual in the world of egg sanitation, one of the reasons is that it does not recycle water at all, for any reason. This means it needs less chlorine or sanitising solution. It also means you are not pumping dirty water all over your eggs whilst ‘cleaning‘ them, It does not spray huge amounts of water onto your eggs (essentially soaking them – which you ought not to do), it uses brushes to remove blemishes and sanitise. Essentially this is a continuous rinse and sanitise system.
If you have ‘black’ eggs then they shouldn’t be ‘washed’ but discarded.
The seller of egg washing liquids or powders doesn’t know about the levels of free chlorine already in your water. So a ‘rule of thumb’ is appropriate.
Test your solution and water often, make a big sign that says what to do and tell any inspectors or visitors that this is what you do….and do it.
Eggceptional Egg wash powder
50 parts per million (ppm) free chlorine for a Sanitouch is good, in the wash solution, a little more is OK but certainly do not overdo it. 50 ppm is a lower measure of HIGH free chlorine test strips.
10 litres of water with 50 grams of Eggceptional, would normally equate to 50ppm of free chlorine in the mixed solution, but again test and check. The manufacturer does not know the makeup of the water you are using, so a rule here is difficult as elements within the water you use can react to create different levels of free chlorine, as can the water temperature.
For example (for 10 Litres) 10L * 0.0025 =0.0025 kg or 25 grams of egg wash powder.
And for another example 20L * 0.0025= 0.05 kg or 50 grams of egg wash powder.
Both examples are for 50ppm. Another way to look at this is
- 100grams per 10 litre to get 200ppm
- 50 grams per 10 litre to get 100ppm
- 25 grams per 10 litre to get 50ppm.
Eggceptional Q Egg wash liquid
Specifically developed by Bellsouth for discarded wash solution egg washers, and particularly for the Sanitouch egg washing system. Eggceptional Q is a Quat’ based dual active washing liquid. Eggceptional Q also contains Ethanol which adds to the anti-bacterial qualities. Both the Quat’ and Ethanol serve as water dispersants which act to shed the eggs of water. Quat’. There are Alkali salts added as well, however on advice from a number of food security experts we suggest measuring Active Quat’ level as opposed to Alkalinity levels. Quat’ compounds are more persistent in their action than chlorine but less corrosive. Being a liquid mixing is also easier.
Be aware that you should not throw Quat’ based waste wash solution anywhere where you need bacteria, i.e. do not throw it into or near a bacteria based sewerage system.
50-100 parts per million (ppm) active Quat’ for a Sanitouch is fine in the wash solution, a little more is OK. Eggceptional Q also contains Ethanol which adds to the anti-bacterial qualities, you need Quat’ tape to measure Quat’ levels.
Use as per Eggceptional instead of milligrams the measurement is millilitres. But measure active Quat’ with Quat tape.
Now please read on for the Sanitouch machine specifically.
Method for Sanitouch egg washing machine
Get some buckets, or tubs that hold a known amount of liquid. A known amount of water is needed for the egg wash concentrate, and final egg wash solution going onto the eggs.
Use a large drum or bucket under your machine, empty.
Use a smaller, 10-20 litre bucket for your egg wash solution (stock tank) fill this with your water, to the brim.
Put a larger bucket under the machine and make sure waste water goes into it.
Run your machine with water and stock tank (filled with water) for half an hour. Turn off let water drain and settle.
How much water is in your waste water container? Measure it.
How much water was used from your stock tank, measure it. The simple way is to refill to the brim using a measuring beaker of some type, the amount used to refill equals the amount used.
OK perhaps you found you used 28 litres in half and hour total water.
This is 52 litres for an hour
Your need 52 X 0.0025 = 130 grams of Eggceptional.
Now you have measured how much water you used from the stock.
Let’s say 6 litres
This is 12 litres in one hour.
Mix 130 grams of Eggceptional to 12 litres water in stock tank for one hour of operation.
Mix very well.
Run washer with your egg wash concentrate and water, test outgoing water with ‘free chlorine’ test strips, check for 50 ppm, and adjust chemical solution as required.
Adjustments, 2 Methods:
- The chemical pump can be sped up or slowed to change how much egg wash concentrate is mixed with your incoming water. So this means keep egg wash solution as it is and adjust the pump until satisfied.
- Leave the pump alone and adjust your solution until satisfied adding or taking away water to the solution. We kind of like this idea because when the ratios are all sorted out, it is very, very unlikely to need changing. You are dealing with a known quantity in your stock tank a known amount of Eggceptional to mix into that tank.
Once adjusted don’t touch things much, checking is OK but fiddling with the mix and chemical mix rate is not wise.
Notes: Regularly test the levels of your outgoing (mixed) solution, just to double check all is well.
Measuring chlorine levels can be difficult we have found that measuring in cold water gets more readable and consistent results. So to check that all is well with the chemical mix attach cold water to the hot water inlet and check that way….. Careful, you must replace the hot water as you should wash your eggs in hot water.
It is best to mix a new egg wash concentrate every day, as chlorine will degrade, when exposed to the environment. By making a fresh batch when needed, you are being surer of washing or sanitising. If you don’t want the hassle of making multiple solutions in a day, then make the concentrate stronger and mix less of it with your incoming water.
Alternative Feed Method
Many people have a desire to mix their own feeds on a small scale. The motives vary from an attempt to save money, a lack of performance or availability of regular bag feed, or perhaps in order to gain more control over the contents of the foodstuffs.
However traditional mixing of the feed ingredients does create several problems. The time, effort, and equipment required to effectively select a variety of feed ingredients, balance the quantities so the birds receive the correct diet, crush and blend to the final product usually ends up being more trouble than it is worth. Add to this the fact that without some preservatives to prevent oxidation of the feed it will quickly go off. This means mixing every few days is essential to maintain the quality, particularly for breeding birds and chicks. Research with the domestic fowl has shown conclusively that the birds can select from a variety of feed ingredients placed before them and balance their diet to maintain good health and high production. Testing has occurred with chicks, growing birds, layers and breeding birds and shows excellent performance at all levels. Application of this research allows us to achieve a greater degree of control without the drawbacks of traditional home mix feeds.
It is reasonable to assume that most avian species have the same ability. This means we can use a similar system with quail, partridge, pheasants, ducks, geese etc. This method is called FREE CHOICE as it allows the birds to select from several different grains and also a protein concentrate to allow balance. This allows us to buy whole grain and so save on processing costs, vary the actual ingredients offered, and ensure a varied and well balanced diet.
This technique involves the use of at least two, but preferable three or four grains, and a separate source of protein. The usual is to use the gains most available and allow the birds to eat what they want. The grains can be some or all of the following list; wheat, maize (or corn), barley, oats, lupins, or sorghums – indeed virtually any grain. If only 2 are used, I would suggest wheat and one other. Obviously buying grain from the farmer is the best way to go and will save the most money.
The protein supplement will usually contain meat meal (50% protein), lucerne meal, and a complete premix. The proteins that could be used are fishmeal, powdered milk, soybean meal, linseed meal, pea meal, and a variety of other byproduct meals. All will aid in a broad ranging protein mix. Many of these are difficult to purchase whereas the common meat meal, lucerne meal and milk powder are all easily obtained through the local produce store.
With laying birds, a mixture of 24 kg meat, 6 kg lucerne meal and vitamin mineral premix will be a suitable mix. Vitamin mineral premixes with amino acids added will improve performance, especially with light breed layers. For breeding birds, some of the meat meal could be replaced with powdered skim milk (the No Name variety is quite suitable, but avoids synthetic calf milk), up to about 1 kg. If the other protein concentrates are available these also can be added, but be careful of using a lot of lupin meal and linseed meals as these will suppress production if used at a rate of more than a few percent of the total diet. The same mix as for breeding birds can be used with chicks but the premix should also contain a coccidiostat to prevent coccidiosis. The grain selections should also be ground to chick sized pieces.
The birds will consume about 30 kg of protein mix to 70 kg of grains. The exact percentages will vary according to the actual grains used, the temperature, and other seasonal variations.
It is important that birds fed a free choice selection must also have available calcium in the form of shell grit. This may be supplemented by D-calcium Phosphate. A mineral grit is also required to ensure the gizzards of the birds will do their job of grinding up the food. The birds should have access to both these grits at all times. Pigeon grit is suitable for chickens also.
See also
Bellsouth alternative feed products Tri feeder and Scratch trays
Free choice alternative Molodri
Feeders
Written in 2004, this Bellsouth newsletter has been pulled from the archive, and summarises feeders that have stood the test of time.
Bellsouth Newsletter 2004 print version
Turbogrow feeders
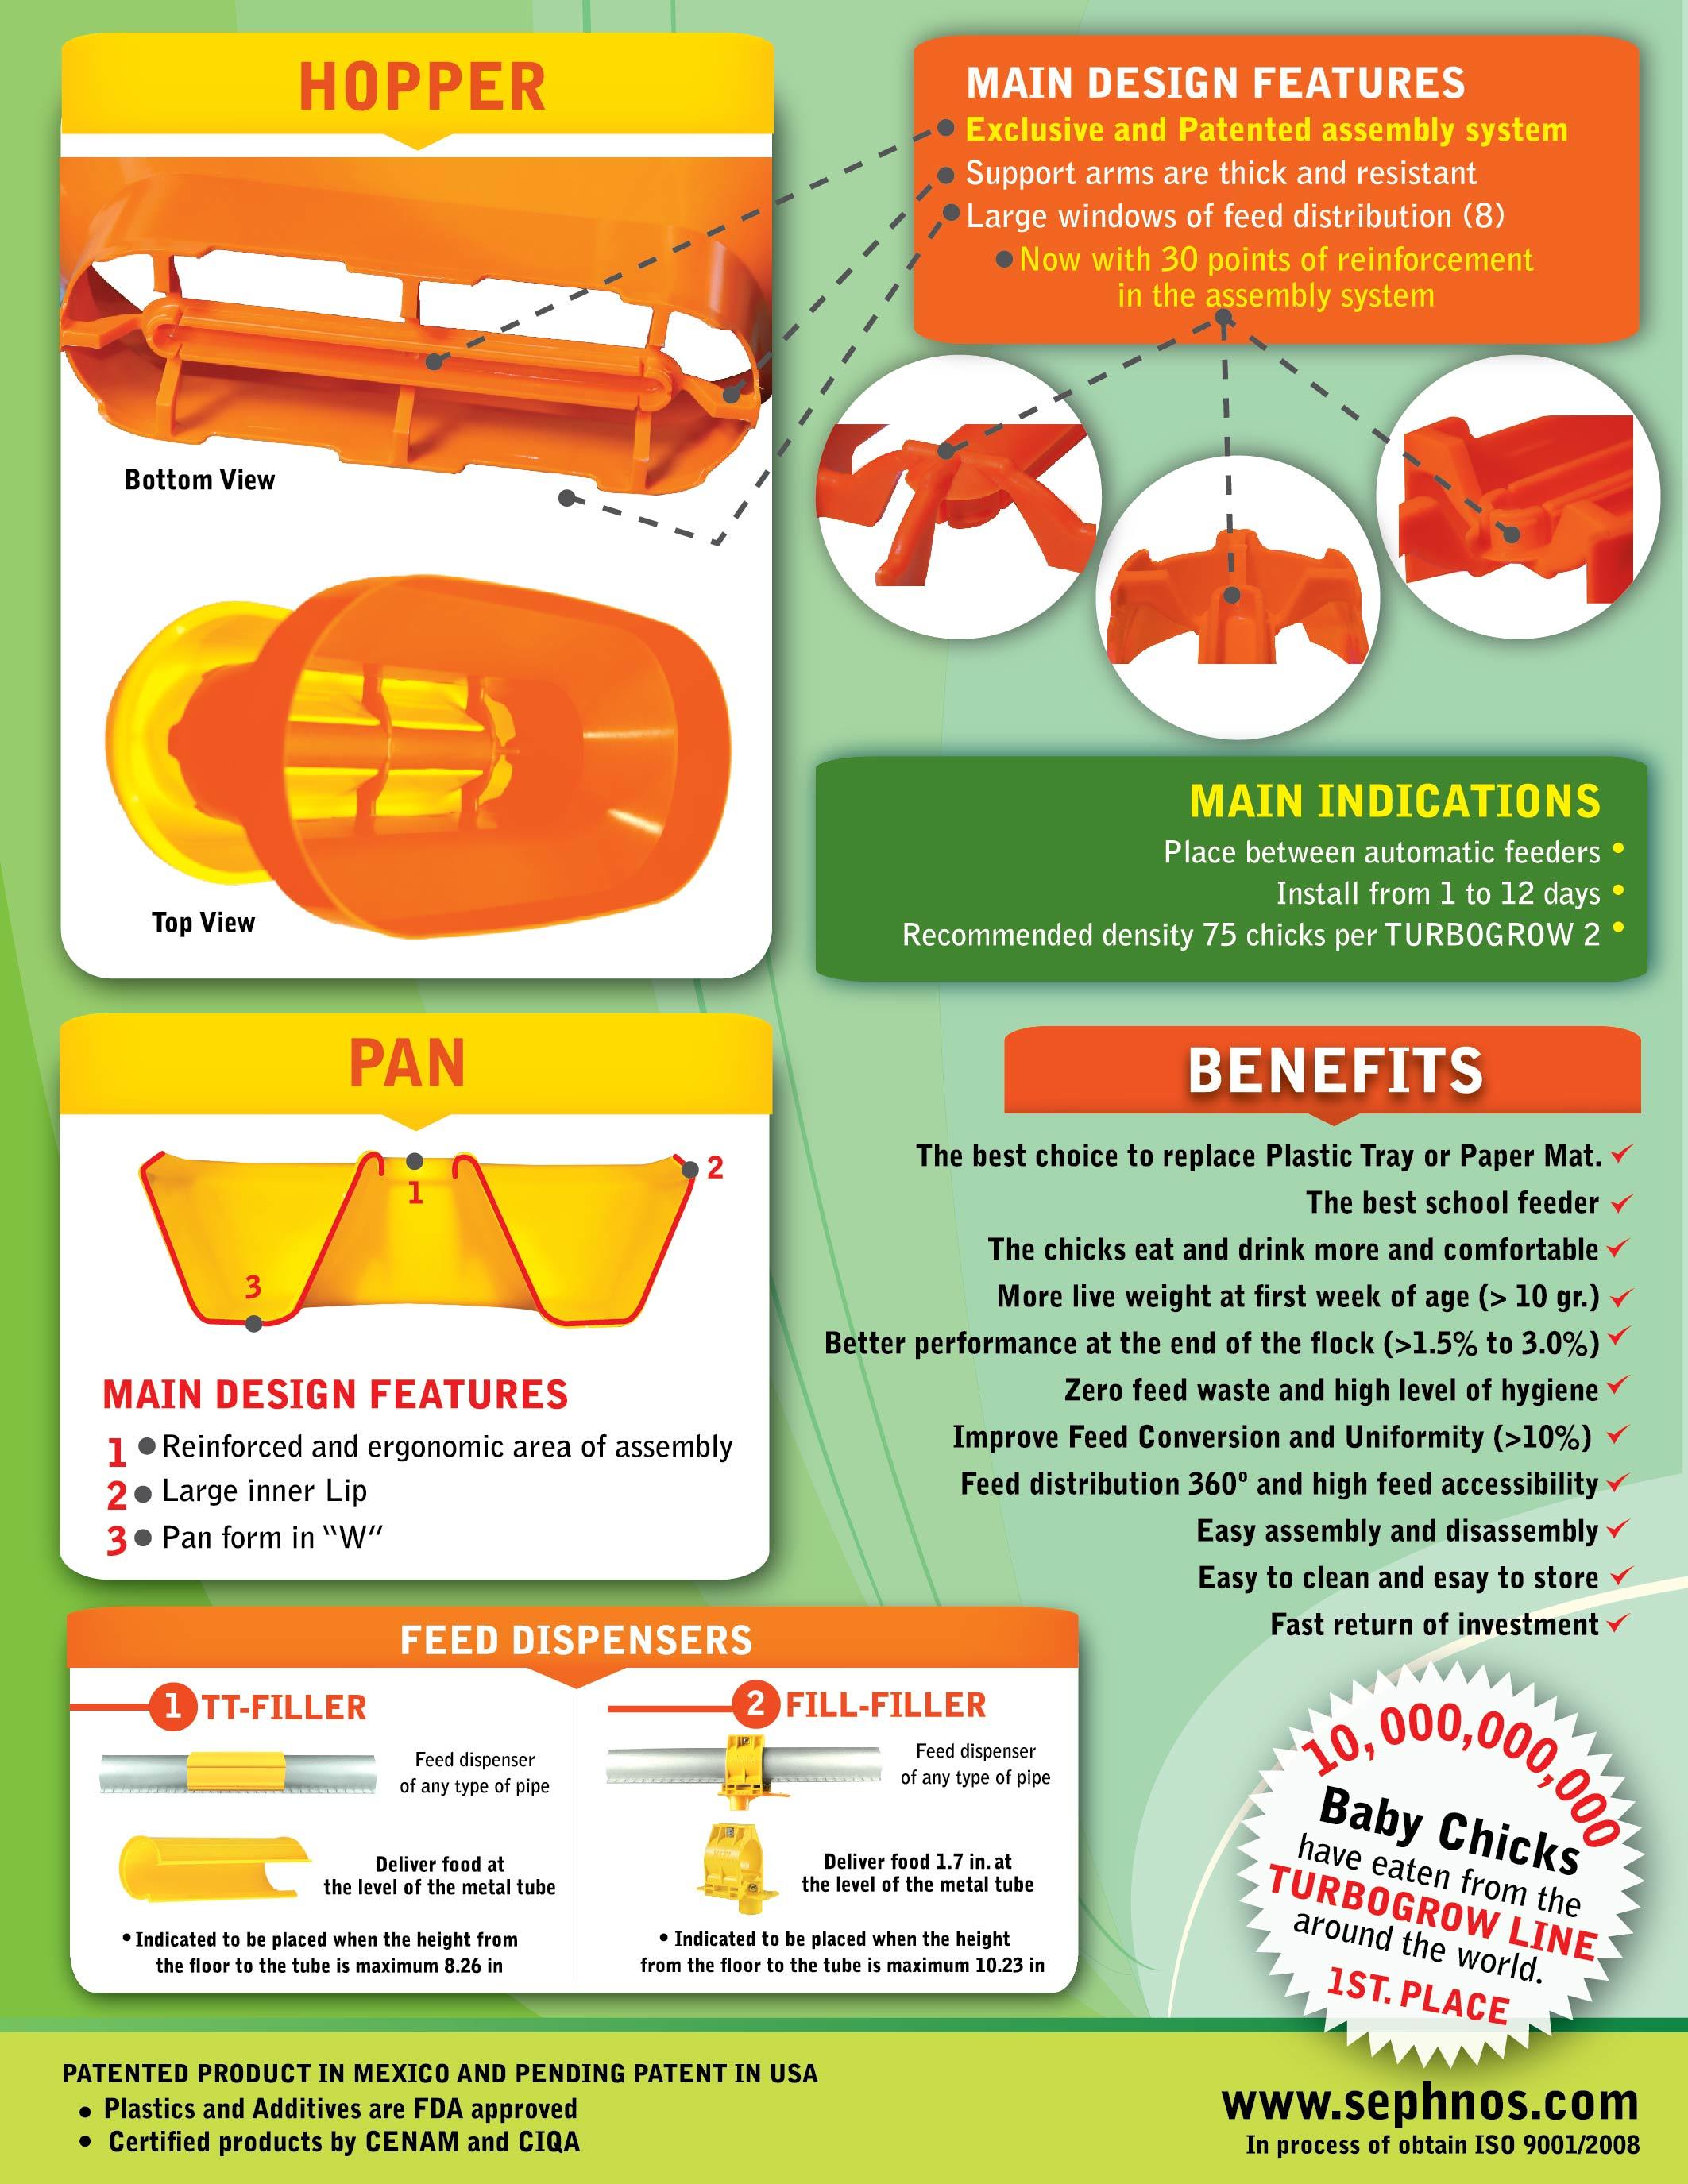
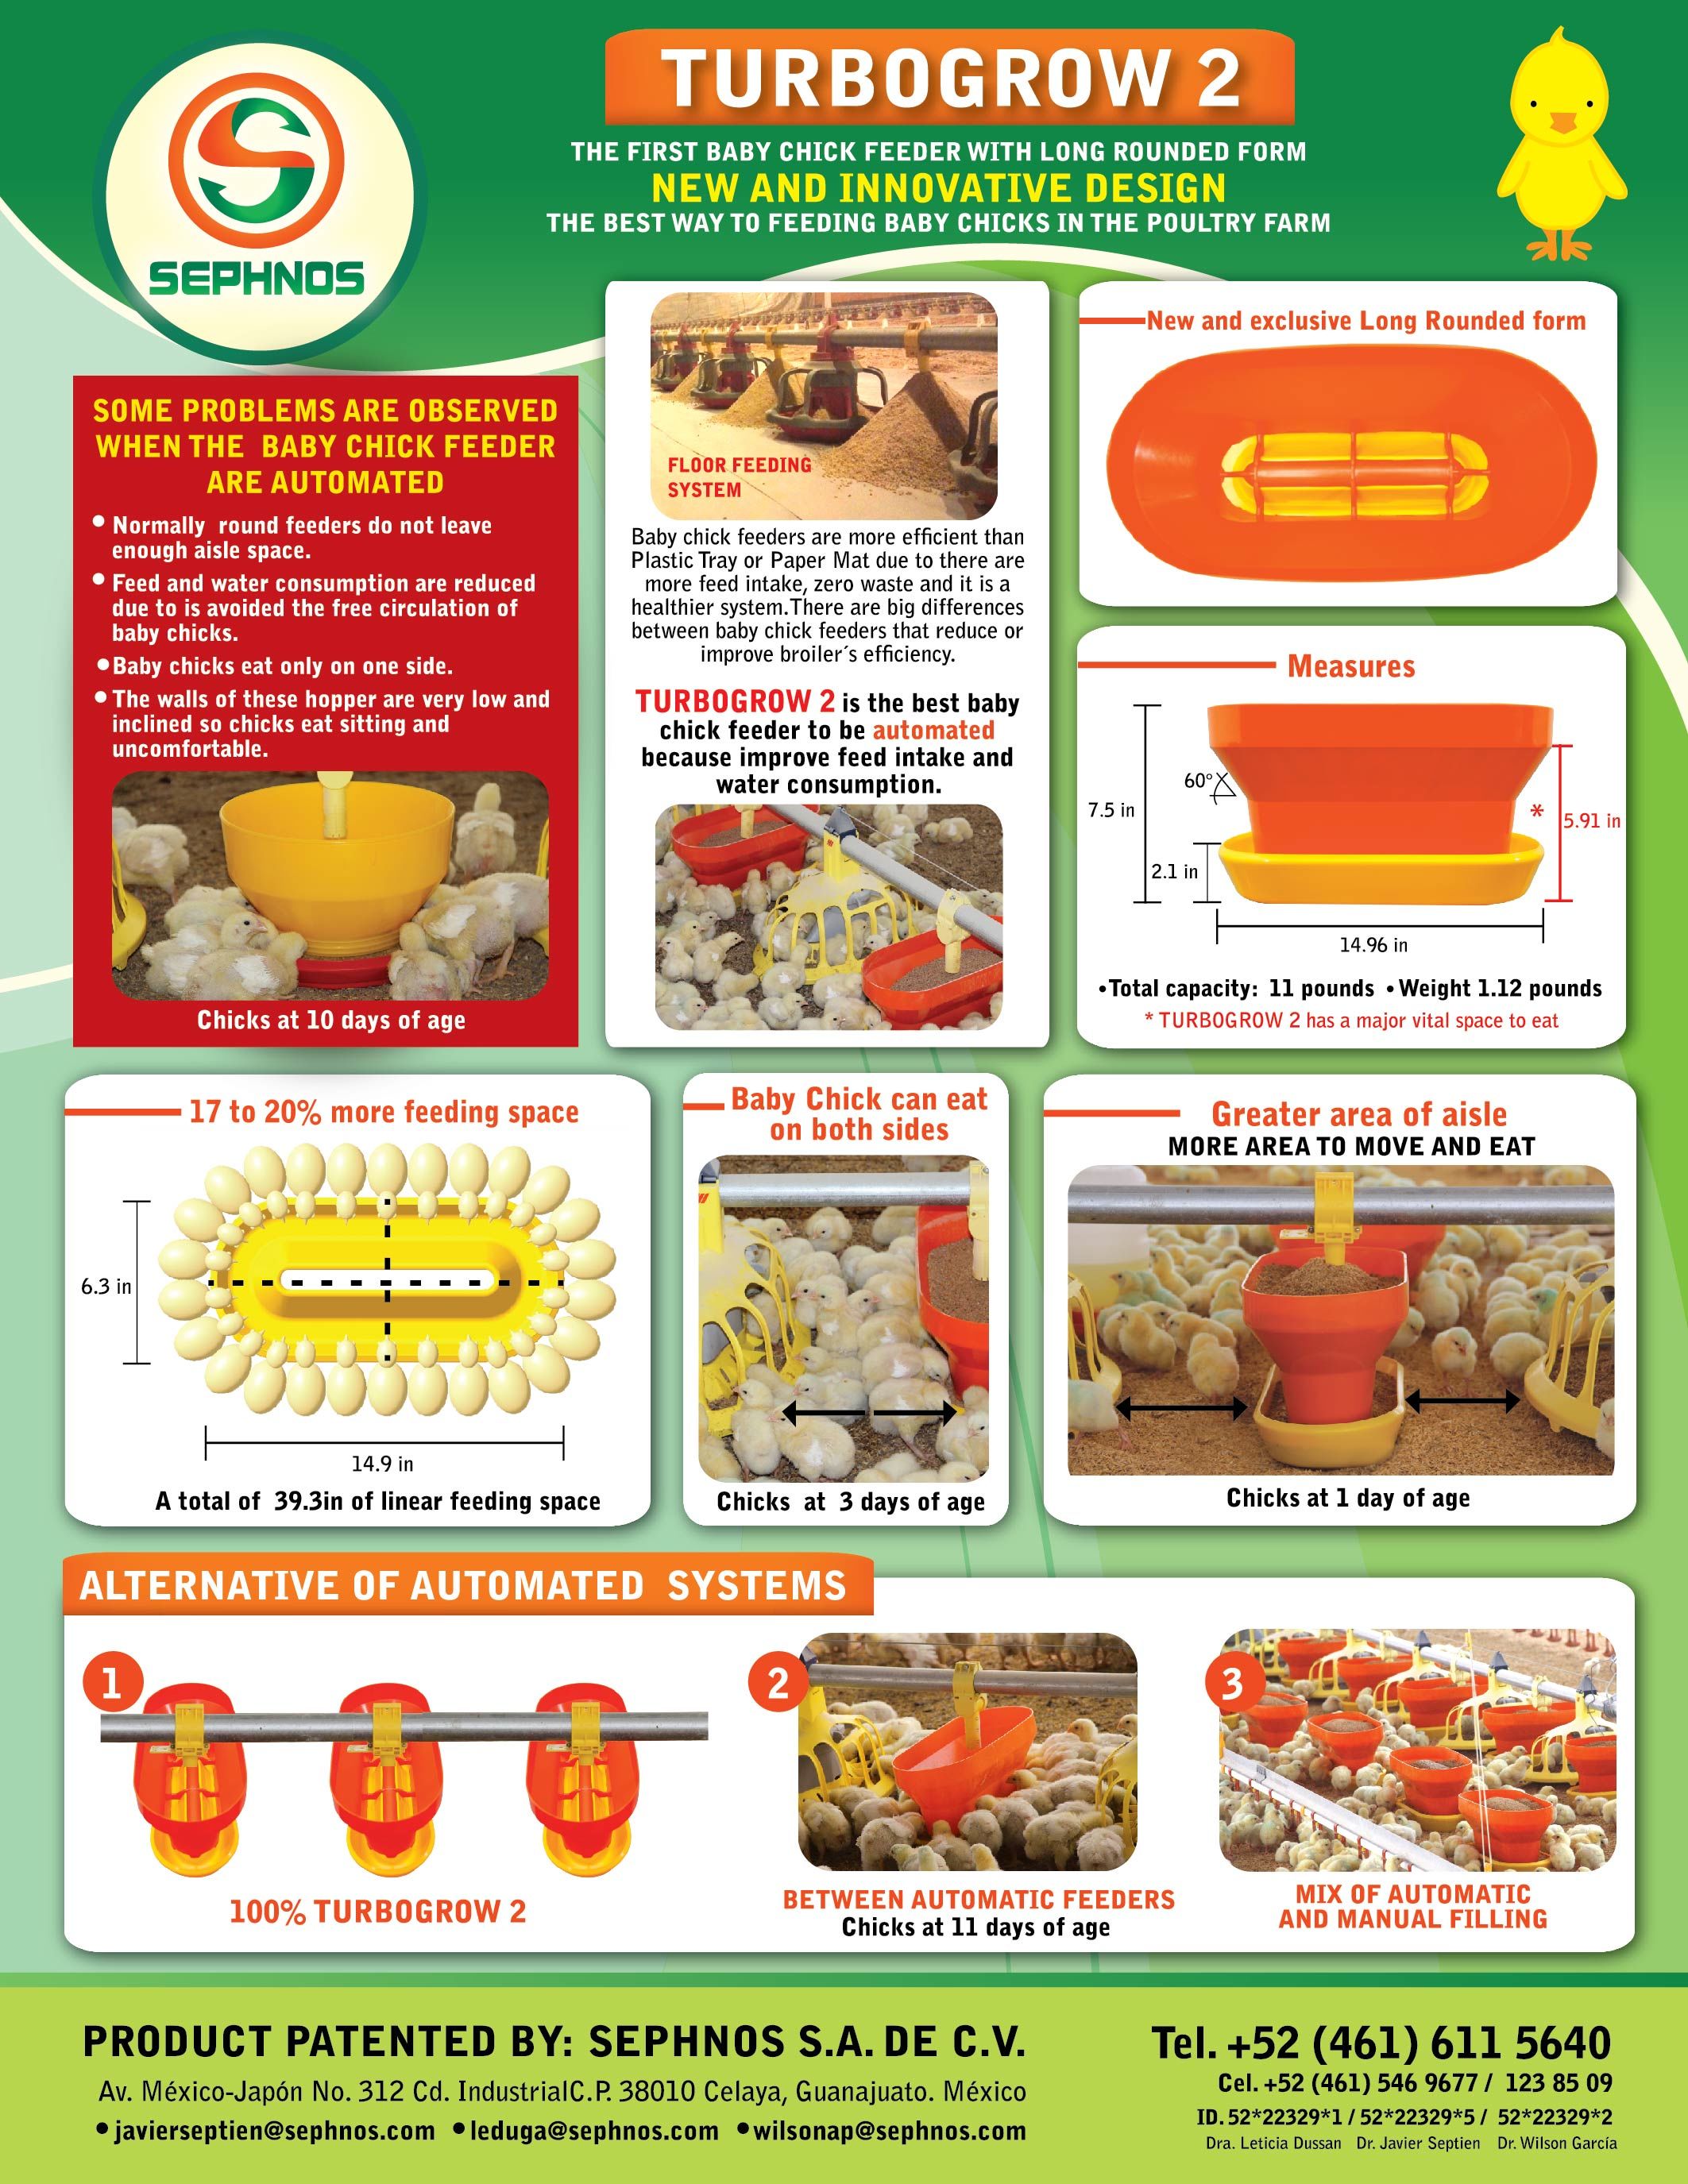
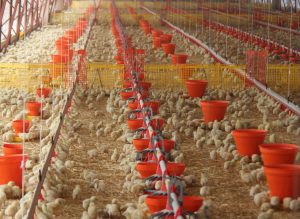
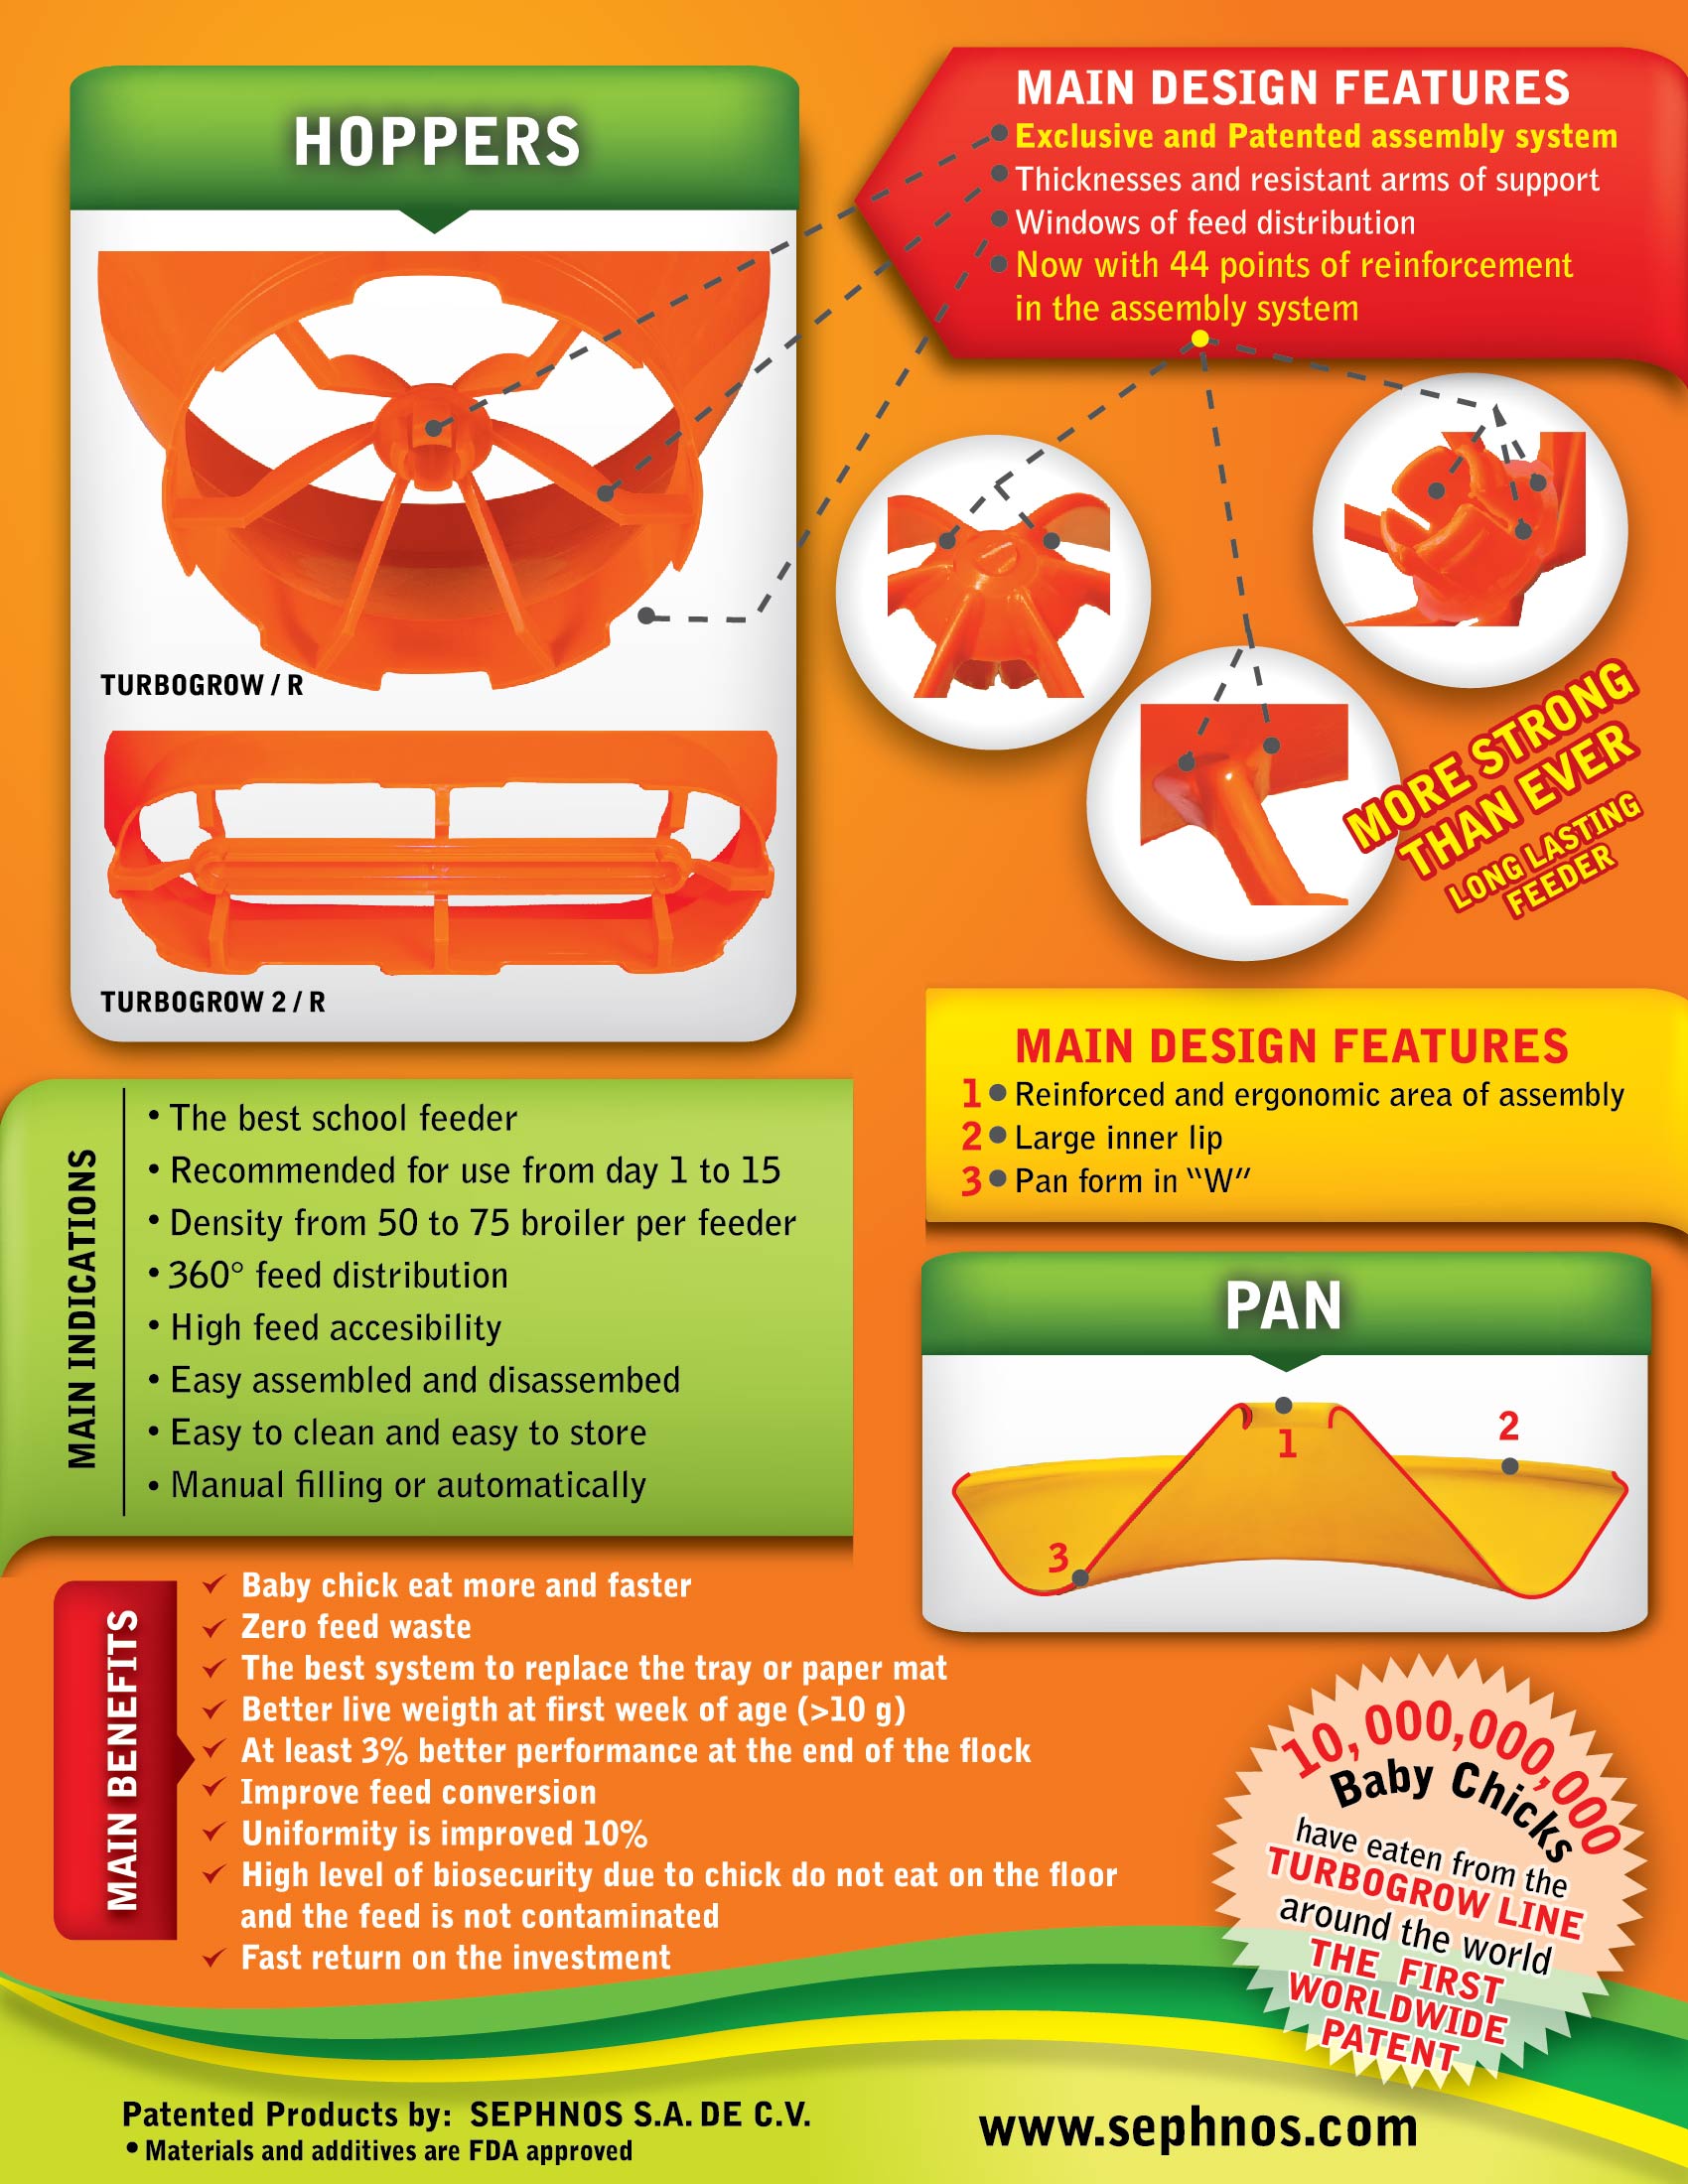
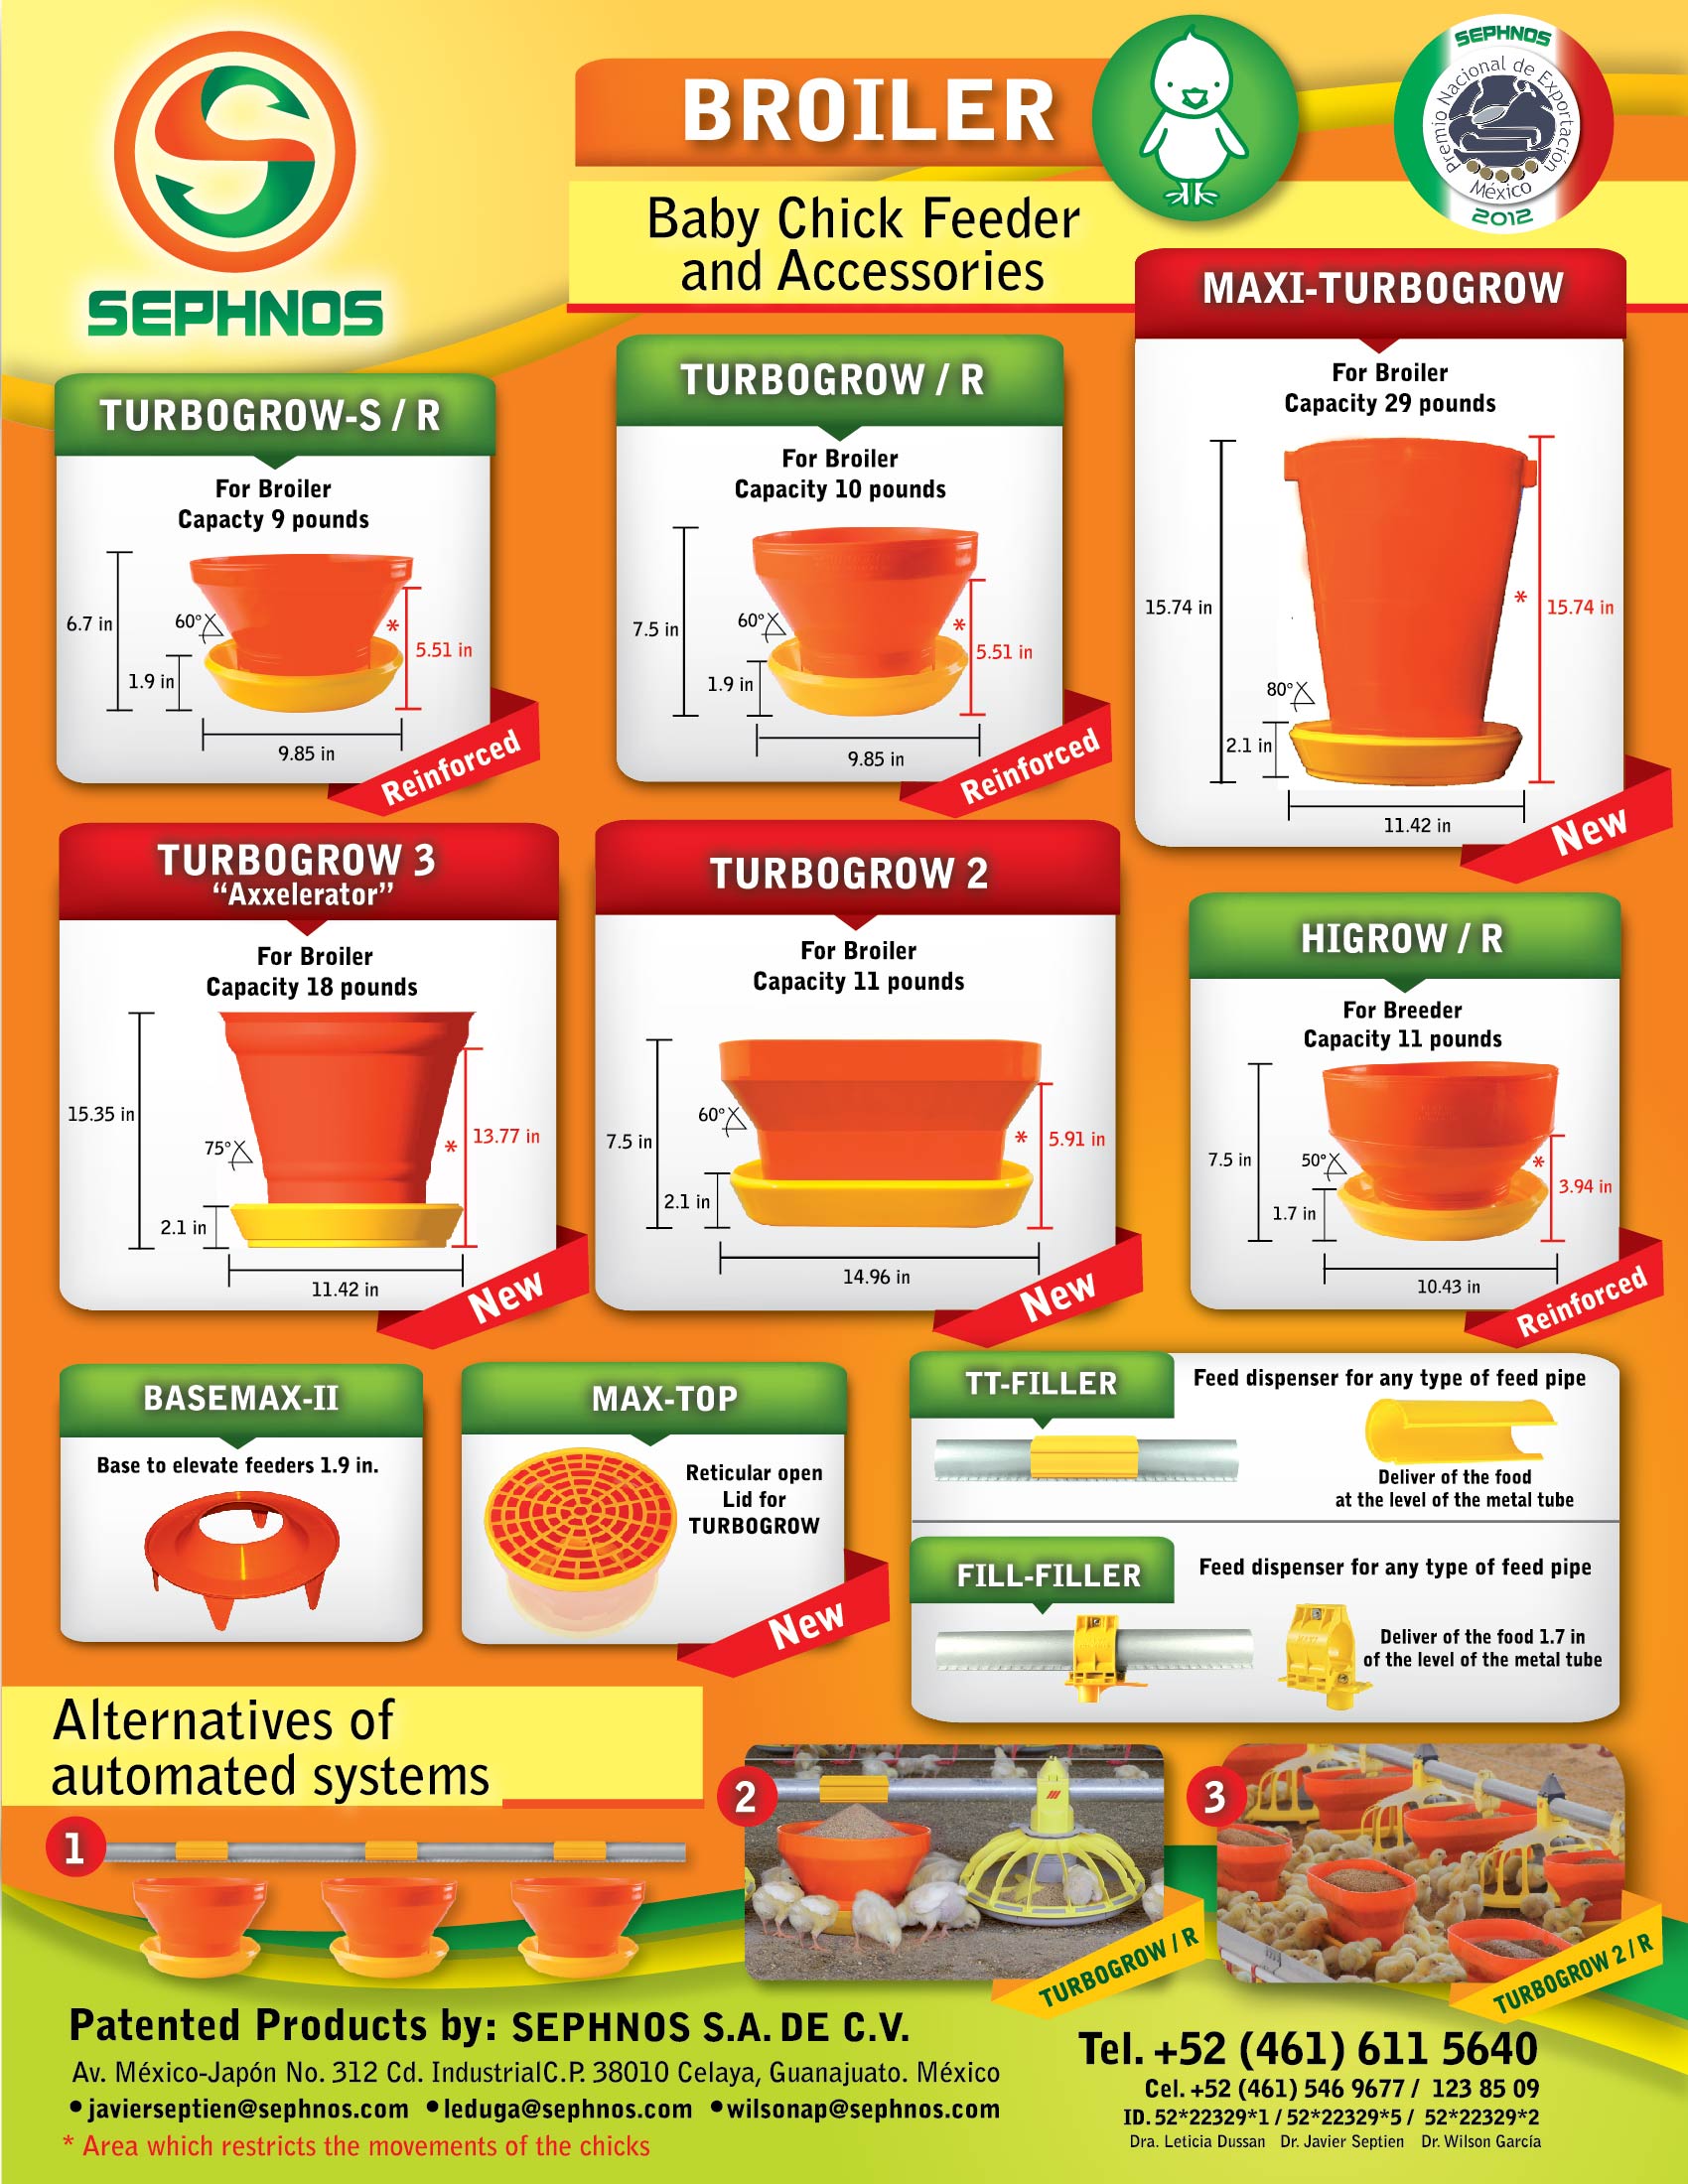 Sephnos feeder
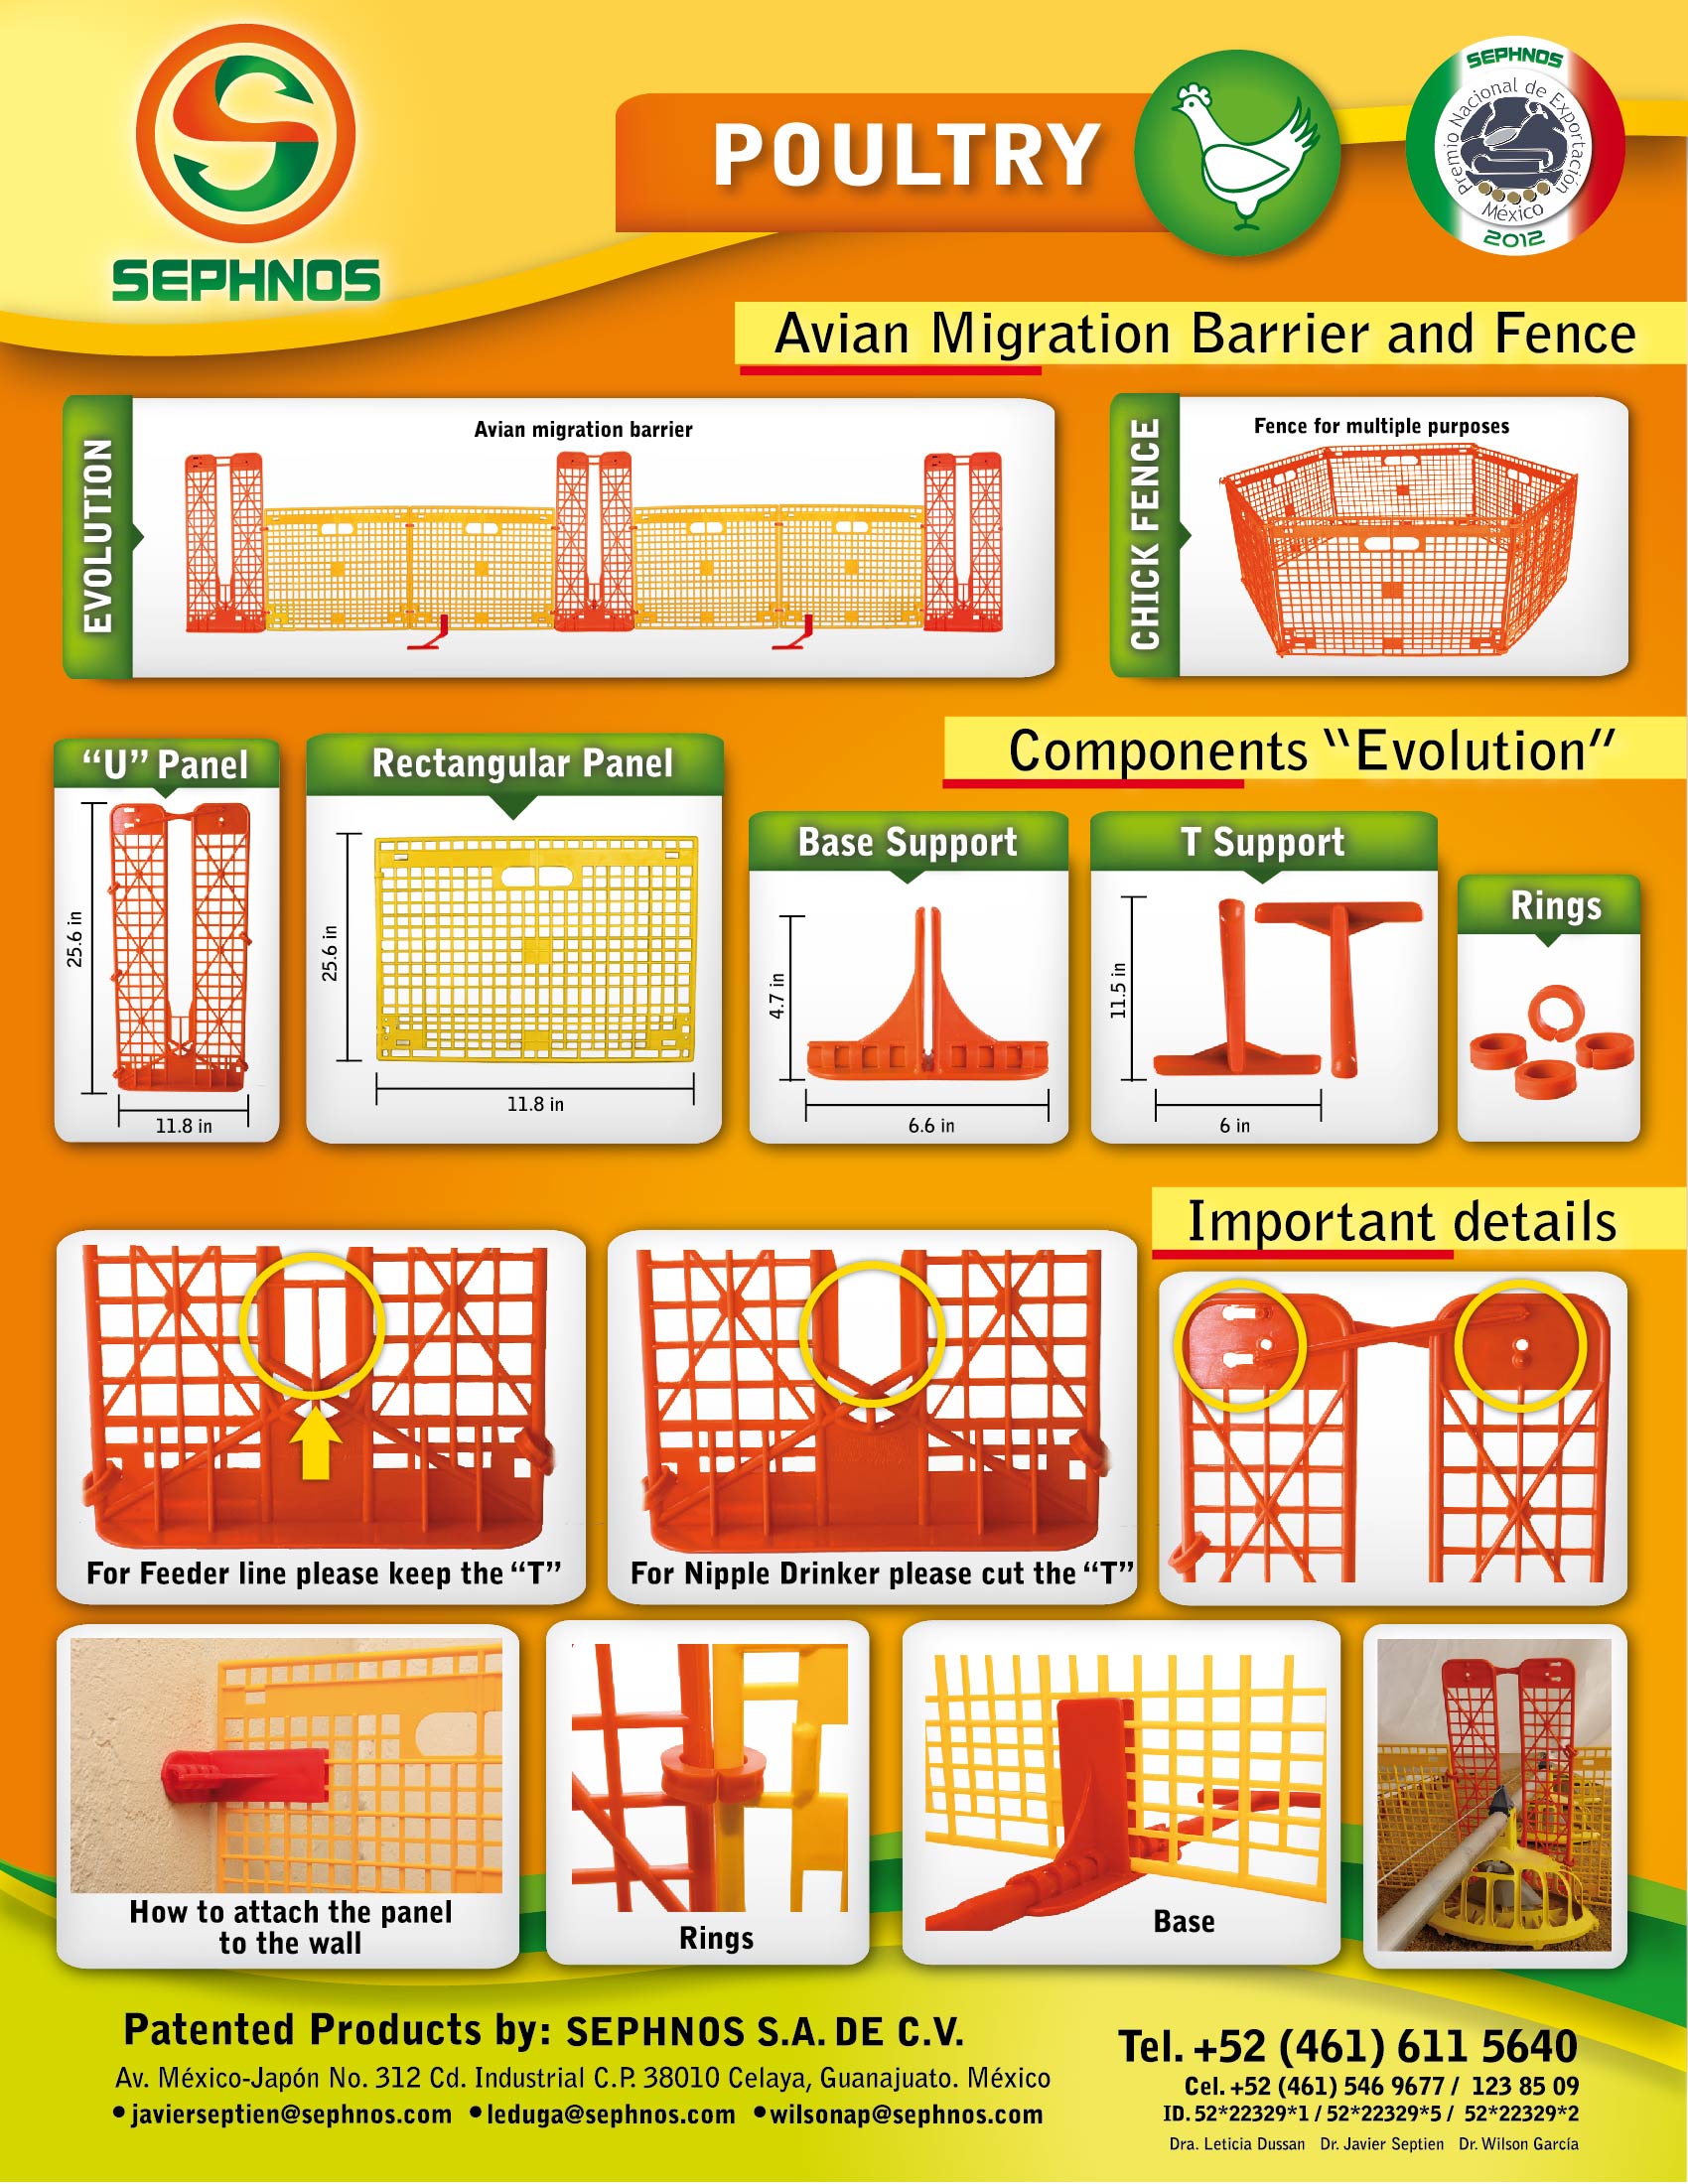 Chick barrier
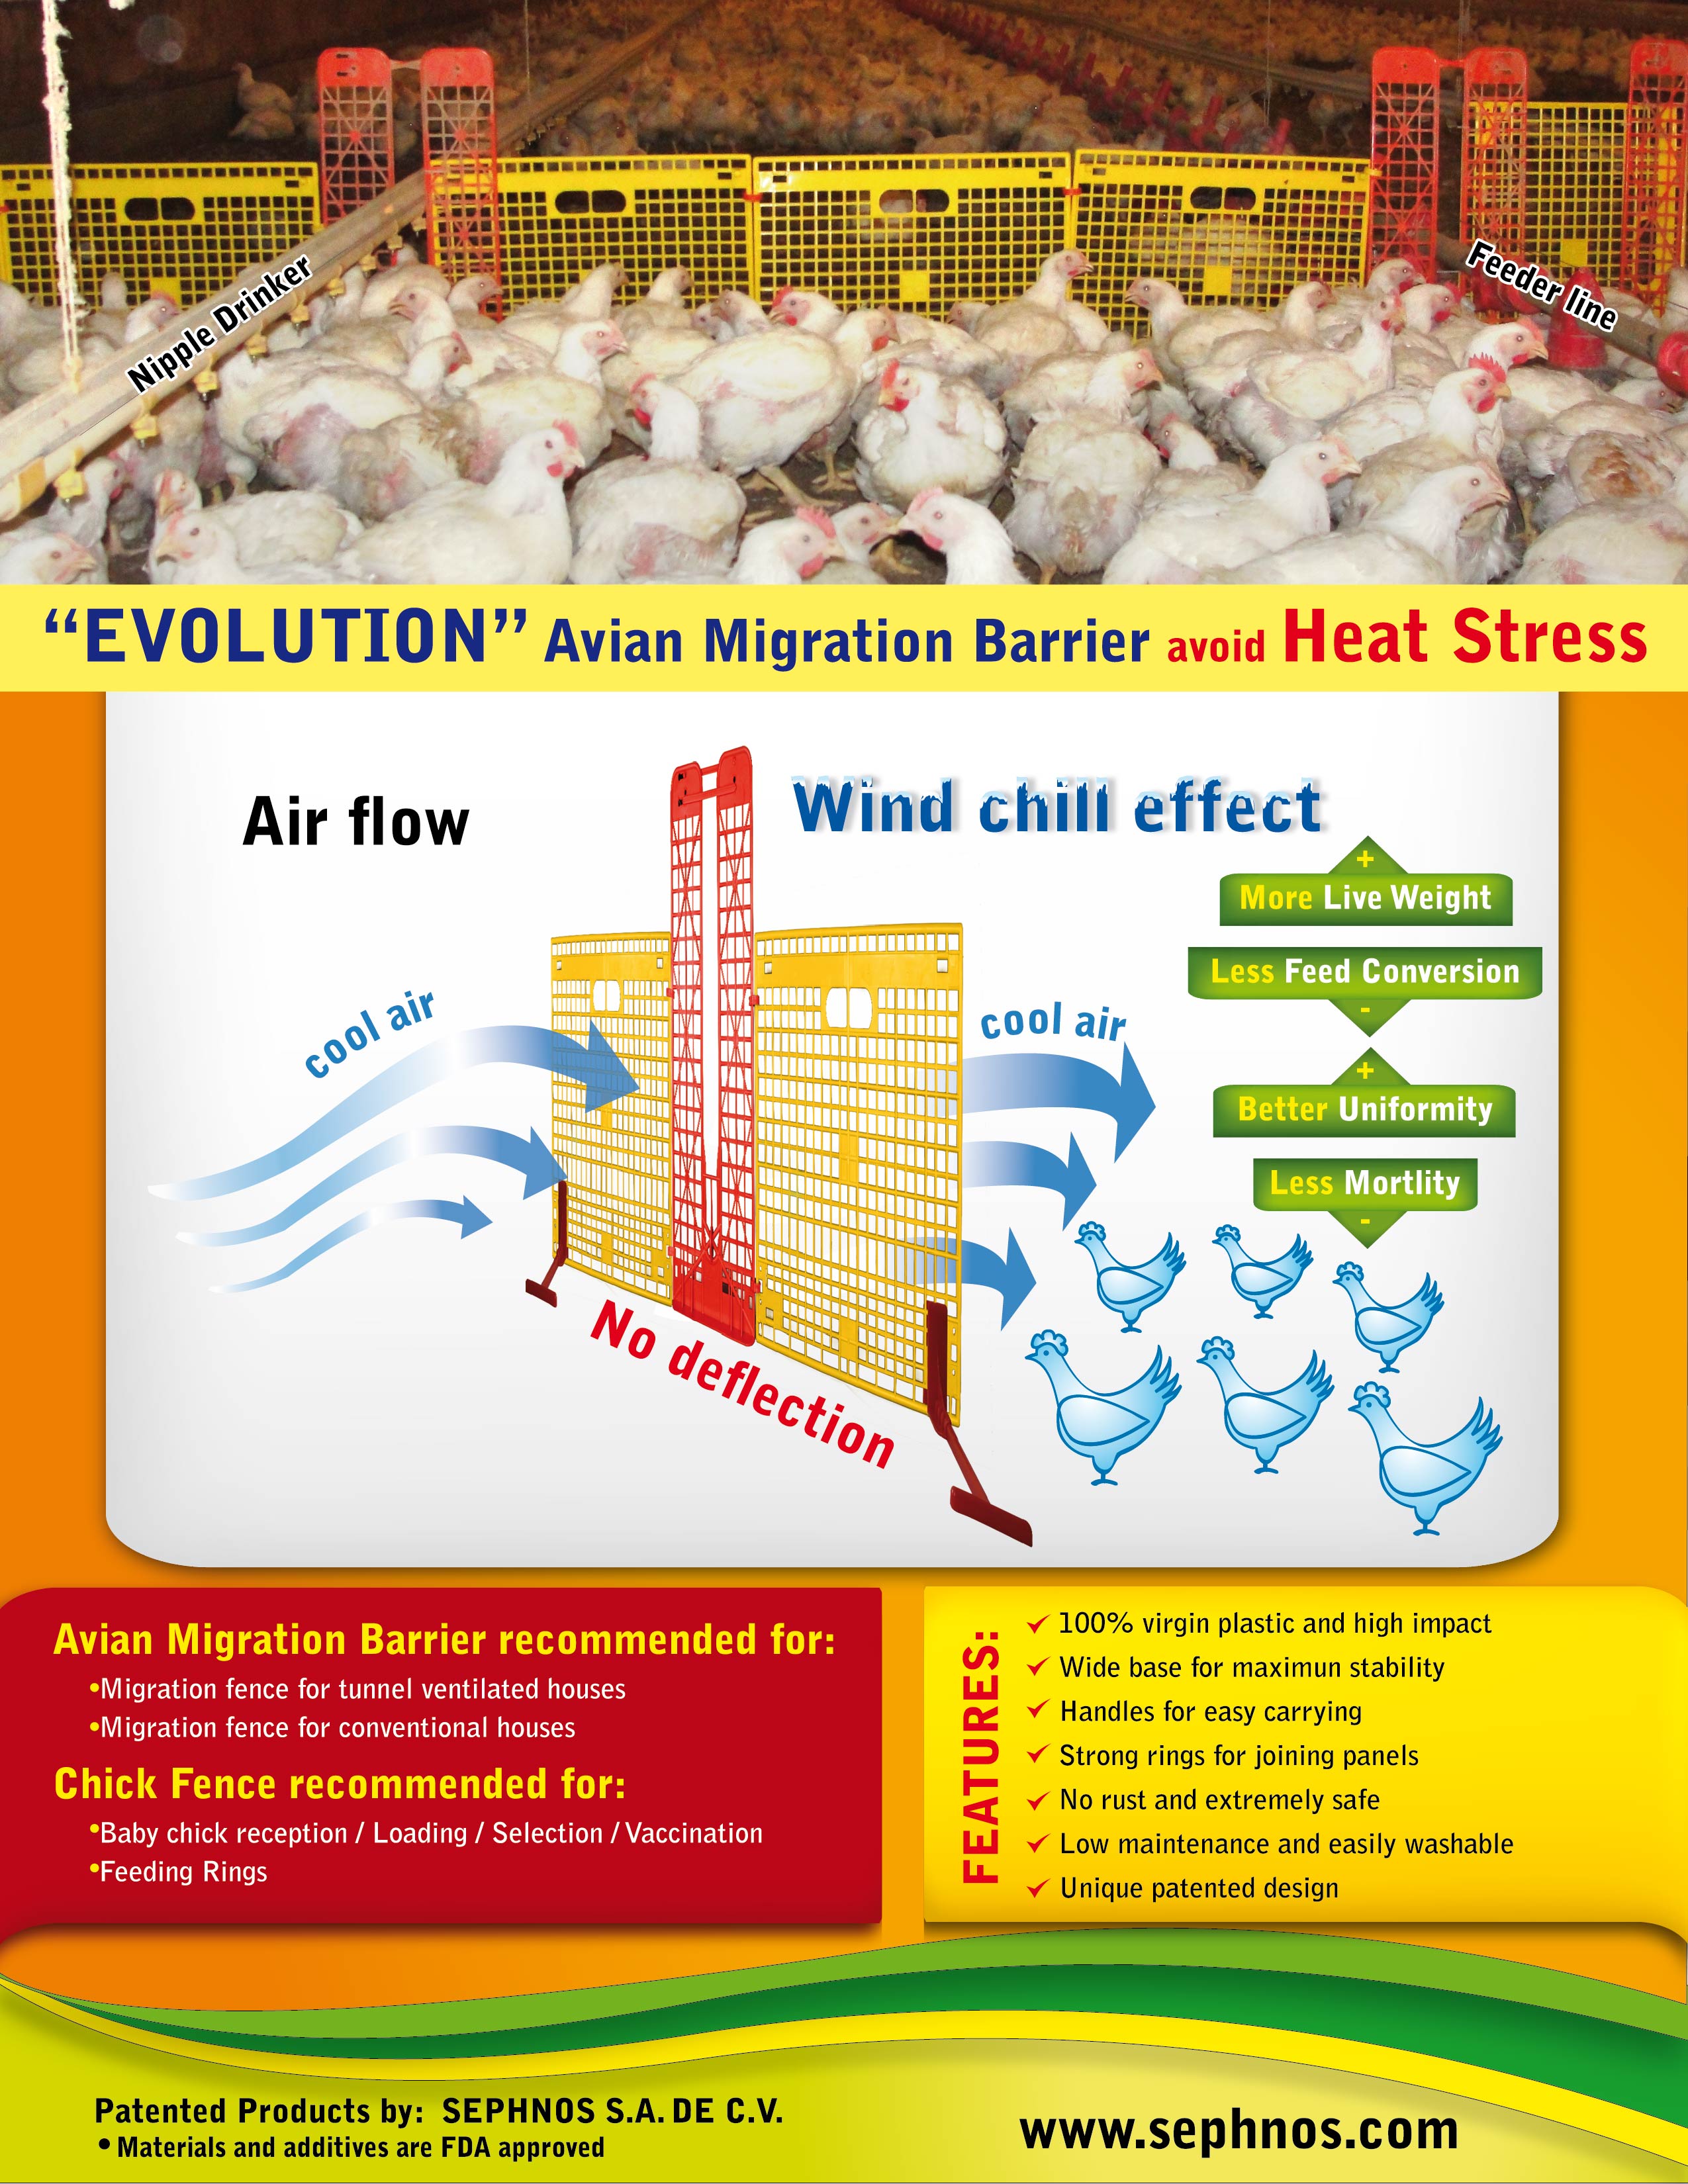 Chick migration barrier
See also
Poultry site article on Turbogrow and on eshop
Bellsouth Feeders
Poultry Drinkers and Water Pressure print version
It is a good to understand a little about water pressure when considering poultry housing. Drinkers are an important need and factor to consider as a part of your poultry housing. This means water pressure is important, as different poultry drinkers require particular water pressures to operate properly.
Feel the Pressure
Water pressure is essentially a measure of the weight of water acting at a certain point. If you dive into a pool you will feel the force of all the water above you, the deeper you dive the more pressure you feel, the pressure is acting on your body. If you use a water pump at home, the pump is adding pressure to the water in the pipe so it can travel where you want it to, even upwards (against gravity) or through clogged pipes (adding friction to make it harder for the water to move). In cities all this water pressure and pumps and friction is hidden from us, water comes out of a tap at (hopefully) a decent pressure.
The units of measurement for Pressure are the Kilopascal (kPa), Pounds per Square Inch (PSI) and Bar (bar).
The ‘Equation’
Pressure (p) = Fluid Density (very close to 1 for water) multiplied by gravity (9.8 or about 10) and the height of water above the object in question).
Alternative measure of water pressure that Bellsouth uses –
You shouldn’t have ignored the Equation above! We use the height part of the equation to describe pressure, calling it Head. Pressure is directly related to height of water (head), above a drinker. We use this measure because it’s used in the industry and because it’s much easier to speak about/understand/visualize than a KiloPascal or a bar.
The point of all this –
Water pressure affects drinker systems. What pressure can my bell drinker’s mechanism handle? Do I really need a pump to use my drinkers? Is my too pressure too high for nipple drinkers?
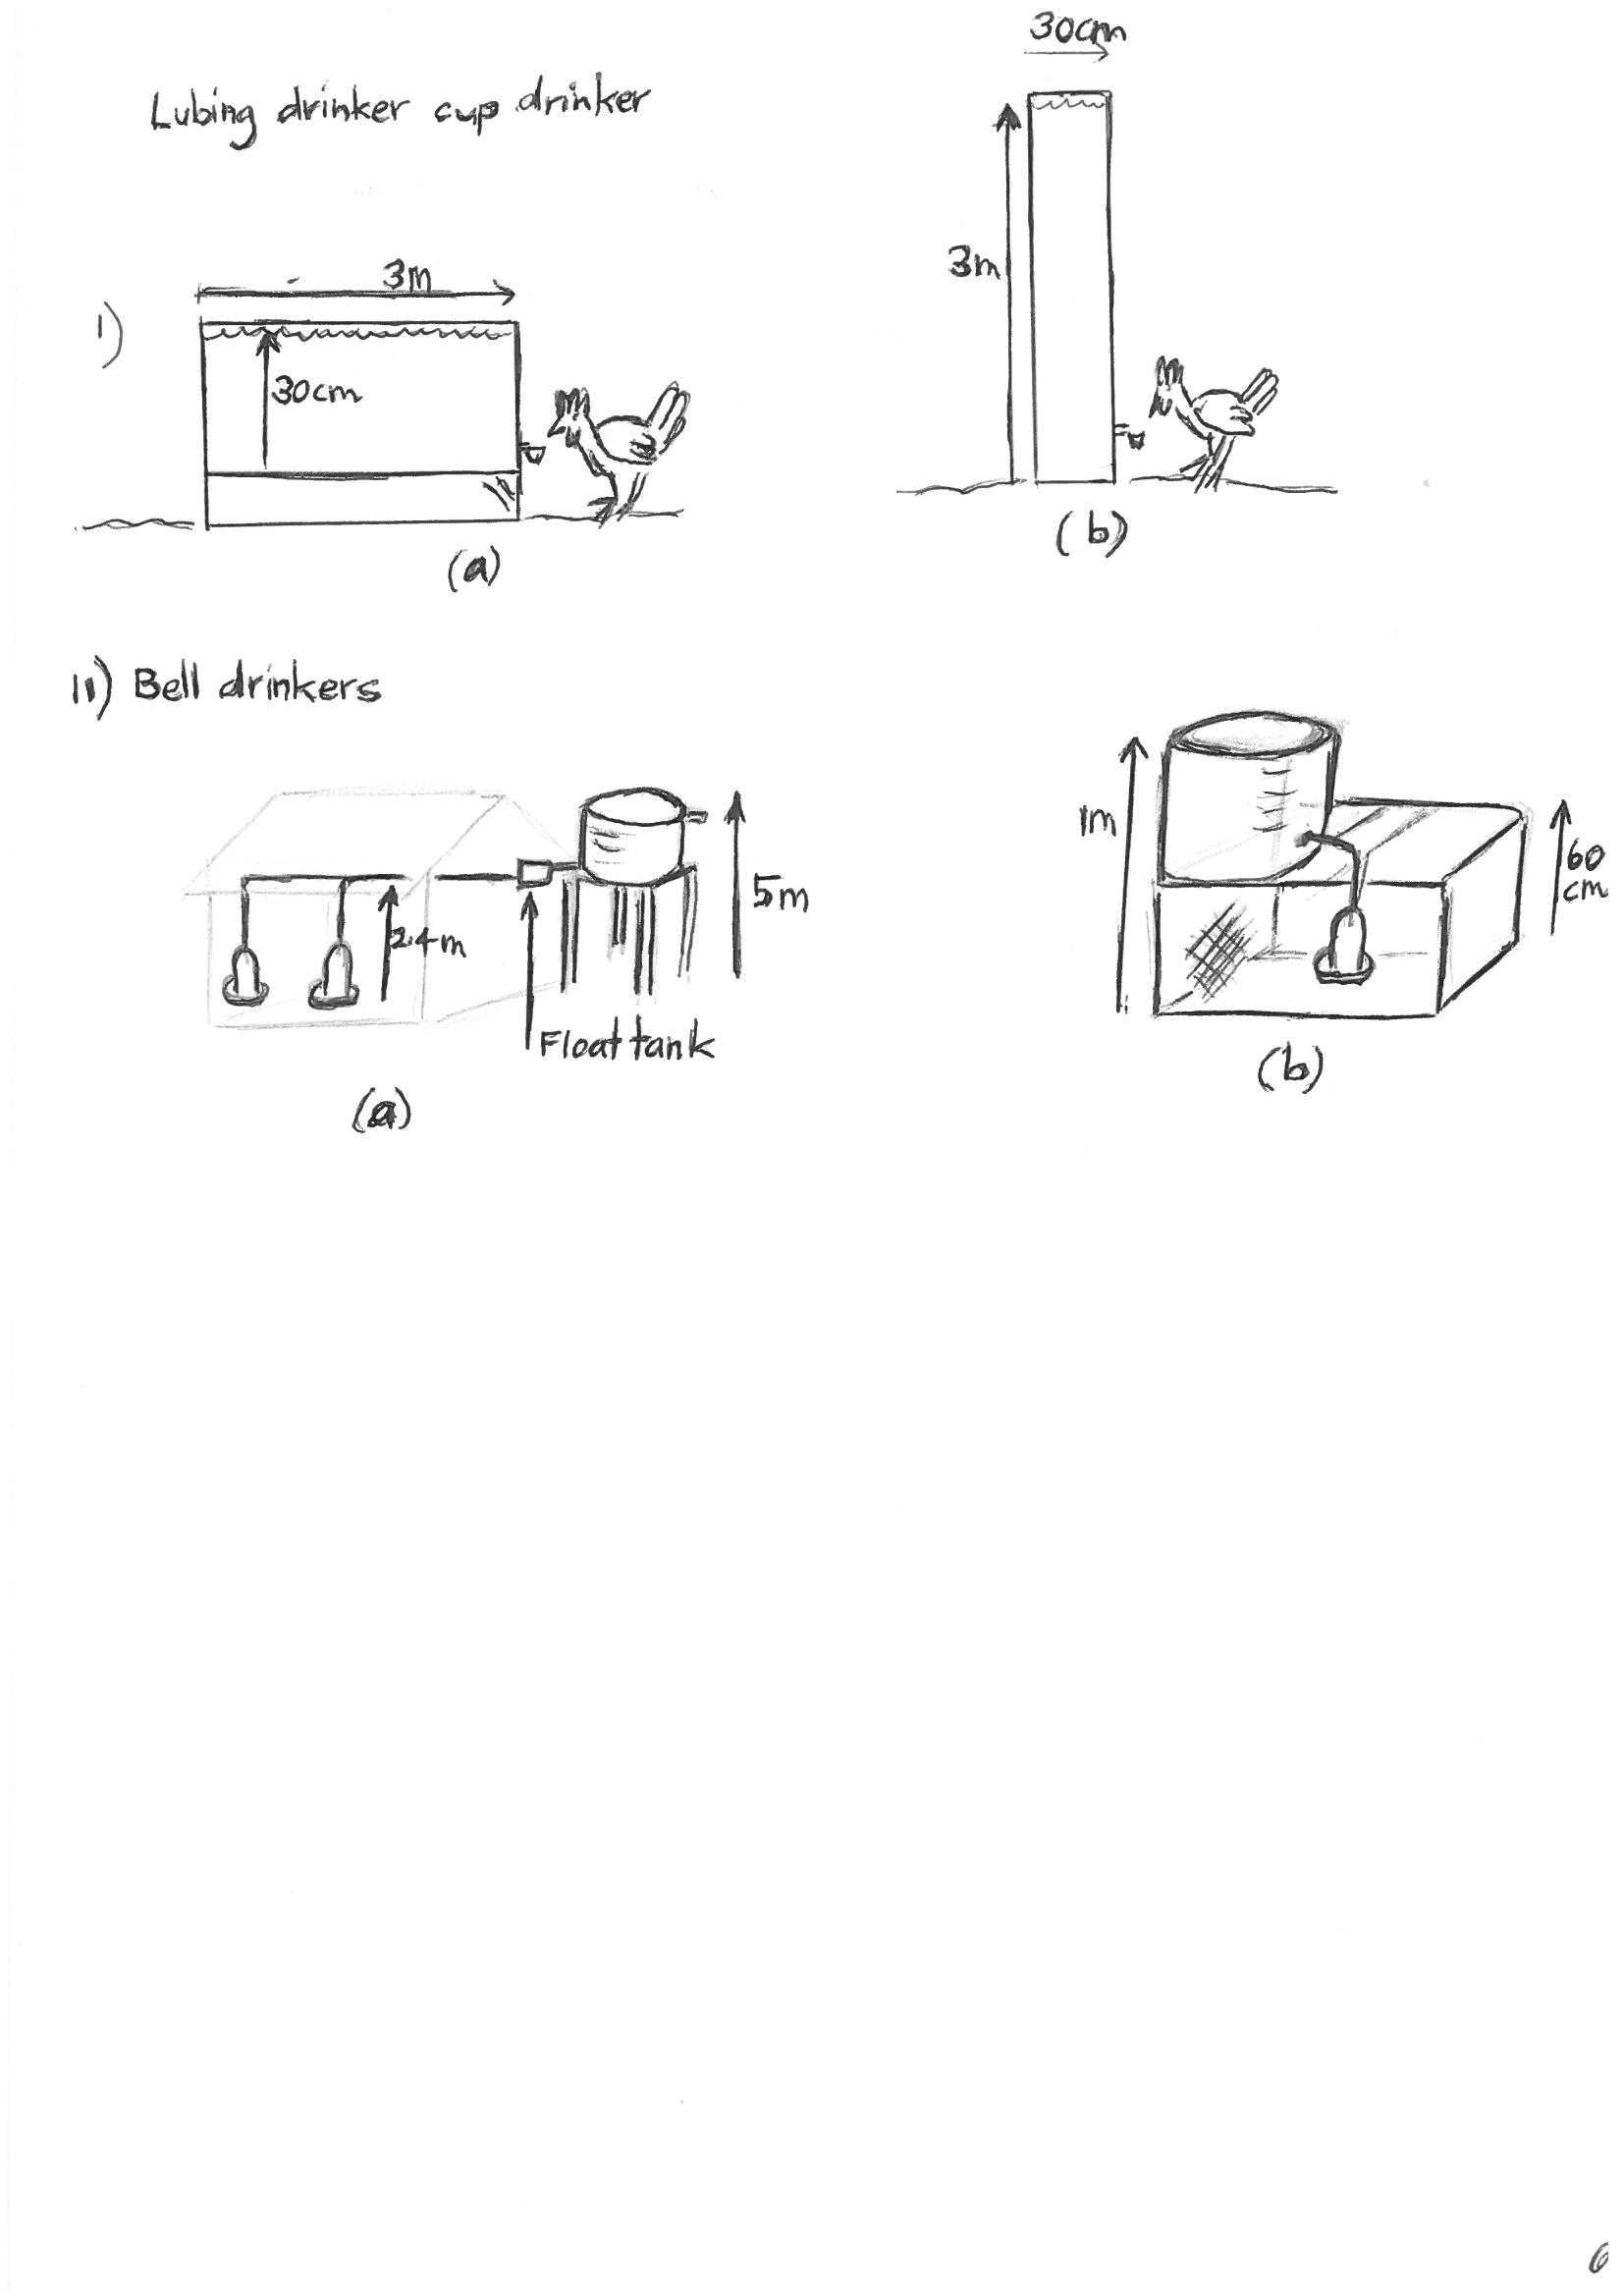
Manufacturers of drinker systems such as Lubing (for nipples) and Plasson or BEC (decent bell drinkers) will specify the appropriate water pressure for the drinker. Stating the pressure the unit needs to start working, and the best operating pressure, or pressure range. In practice, drinker pressure will be given in head height, either in centimetres (nipples and the like) or metres (bell drinkers, some trigger cups). Head height is given and/or measured from where the water comes out, to the top of a full tank above.
To achieve the correct pressure either choose a container of the correct height or continually regulate the water pressure to the correct level. This is done using a Float Valve (i.e. Lubing float tank kit), or an adjustable Pressure regulator (Methven). Most regulators are made for normal town pressures, not your firefighting tap. If your house water pressure is so high that it damages drinker regulators, you have a bigger problem, you should fix that straight away, and/or have a word to your council.
Note:
After you have taken the pressure off the water making it suitable for your drinkers don’t forget gravity still applies. If your drinker line after your regulator keeps dropping (perhaps to another chook house) then that pressure counts. It is not uncommon for people to use a regulator but then their drinker line after the regulator drops further still to lower drinkers. The pressure on the bottom drinkers may end up being too high. So consider your lowest drinker and the pressure it endures in your design.
Bio-security: What is it and why is it important?
Bio-security is a normal part of the management of animals. It is the part of management concerned with keeping animals free from disease and minimising disease spread. Bio-security is the recognition that animals can carry disease and that those diseases can be a risk to other livestock and to humans. Sometimes diseases are not obvious, so we need to have management practices which minimise the risk of disease spread.
In addition, good bio-security recognises the part ordinary people may have to play in case of a disease emergency.
Bio-security is like any other insurance policy, and as such, it is a prudent investment.
Effective bio-security involves assessing the risk to your birds from infective agents, and taking steps to minimise that risk. Those infective agents may arrive by:
Poultry. The most significant source of disease is contact with other poultry, from other breeders, farms, auctions, and sales, or at exhibitions.
Other animals. Many animals carry bird diseases. Wild birds, feral animals, domestic animals, other livestock, insects, rats and mice all can bring disease into your flock.
People who have contact with other poultry and birds can bring disease into your flock.
Water supply to the birds can be contaminated by other animals and become a source of disease entry.
Feed can be contaminated particularly by vermin, mould and bacteria, and may be contaminated during production or storage.
Poultry litter used as fertiliser on small holdings can bring in disease from another farm.
In some cases disease can be carries by dust, or as fine particles in the air particularly from larger farms.
Ensure your bio-security plan has:
1/ Routine Management plans.
Good bio-security is a part of good management. It means that the daily tasks and events of normal poultry management are carried out with an understanding that good farm management can have wider significance than just for your own flock, but for your own health, the health of your neighbours and their flocks, and for the health of the commercial poultry industry upon which we all depend.
Incorporate good bio-security techniques into your management. Very simple measures include foot dips with Virkon S, washing hands before and after handling hens and equipment and limiting visitors to hens.
2/ Action Plans for Suspected Disease Emergencies.
In order to play a proper part of the community action in case of a Disease Emergency, prepare for what is required in those situations. Written emergency plans such as checklists include features such as reporting of unusual disease symptoms, who to contact, cessation of stock movements and minimising of people movement in and out of poultry areas.
See also
Poultry Hub – Disease prevention (external site)
Farm Biosecurity resources for Aussie poultry farmers (external link)
Factors in design of Free Range
Free range farms are undergoing a change. Historically, free range and organic farmers have been considered a little odd. They were prepared to work at being farmers, and the bottom line was less important than the philosophy.
Times have changed, the gap in price between free range and cage eggs has declined, free range and organic farm sizes have rapidly become larger, many rivaling the size of the free range farms of the 60’s and 70’s and farmers are finding what those farmers found at that time, that reductions in labour time and costs were important to remain competitive.
Design and automation was the key then, and it led to the intensification of the industry, and the development of intensive cage systems.
To avoid the same problems, careful thought needs to be applied to the automation of modern free range to prevent farmers simply becoming slaves to the farms, and to assist the farmers resist the pressures of competition, while maintaining a reasonable standard of living.
Simple business systems are quite important, and the most is a notepad in the top pocket or notes into your mobile phone. Use it to take notes daily.
First thing to do, is start making notes of the tasks you do each day. Add up the times and then average the tasks on a daily basis. So a task done weekly for 7 hours will be divided through to an hour per day.
Apply a value to that time on the basis that you need to buy labour if you were for some reason not able to do the task yourself. This means I guess, buying labour at the local market rate, including on charges.
Multiply this by 365 to get an annual cost of doing each farm task.
In business terms capital should replace labour on the basis of return time. That is the time it takes for the capital to be recovered by not paying for the labour. A three year return time is a good business investment, 2 years very good, and one year presents an almost unchallengeable business case.
So now you have a basis for making decisions about capital investments. Over the years I have found this formula an excellent way of focusing the mind regarding capital.
Three areas of design need attention when it comes to a balance efficiency of operation and bird welfare. Remember bird welfare is in part good design, in part operator attention and care. Good design minimizes the hazards of the system, operator care fixes the problems you didn’t plan for. Bad design means the operator spends all his time fighting fires, not building his enterprise.
1/ Shed design
Shed design with poultry has always been a problem. I have visited many free range farms where the conditions were so bad that I wouldn’t eat the eggs laid there. I have seen birds reared on farms in free range where I thought all the birds had gone until I got up close and saw that the shadows under the trees were moving, a solid mass of birds struggling to fit into the shade, other places where the birds in the sheds were leaning to stop the wind carrying them away, or where the manure was wet from the rain. So I guess it goes without saying any more, that many free range farms are pathetically inadequate in any measure of welfare or any measure of reason to be recommended. Just having access to outside does not increase the welfare. This also applies to the use of the trendy home chook sheds flogged by many internet sellers and even major hardware chains. In terms of welfare, design of the house and yard is vital, and often simply not suited to Australia.
Ever since free range started to come back onto vogue, free range housing has been regarded as optional, and free range was defined, in part, as unrestrained. I have had a saying, here modified to be politically correct, “if we do not provide housing which is adequate in terms of protection from the external environment, large enough to meet the needs of the flock, comfortable enough for the extremes of climate, then we condemn the birds to be range slaves”.
Every time I publicly raised housing design, the general chorus was, we don’t want housing. The reality is that birds with housing which does not protect the birds from the vagaries of climate, disease, and predators, is arguable worse than well designed cages.
The current range of housing designs in my view leave much to be desired in bird welfare, cleanliness, ease of use and low labour. Too small, too high bird density, poor ventilation, lack of inspection, multilevel perching, all are negatively effect bird health and comfort, to say nothing of the quality of the eggs produced.
However in a low margin, high labour cost business environment, it’s difficult to spend the capital on perceived comfort. Again the clash of philosophy and reality.
2/ Egg collection
Contrary to the press PR impressions generated by some parts of the industry, eggs can no longer be collected in wicker baskets lined with a clean tea towel, one at a time and taken back to the packing area, a few dozen at a time, and lovingly packed in egg cartons with the doting affection of the farmer. They would cost $20.00 a dozen at the current labour costs, and that’s just for the egg collection. It’s also dishonest to portray the industry that way, and dishonesty in the longer term always bites. So using nests which remain clean, allow the eggs to travel to an area where they can be easily loaded into transport media for safe and clean arrival back at the main packing shed is essential.
Twenty five years ago, when I visited Atlanta, arguably the world’s poultry equipment showplace every year (think Jeff’s shed but 3 or 4 times larger), there was only one new colony nest on show. It caused a still because it was in effect turning back the clock, going back to ideas of the 1800’s but with technological improvements. Today, same show 20 brands, all variations on the same theme, all claiming the newest dongle attached, getting more and more complex.
Semi automatic nests, with manual belt wind and manual open and close, meet many of the ideals of nesting systems, but the time comes when the belt movement is better served with motor drive, especially when bird numbers climb above 500 per shed. In addition the synchronism of automatic nest open and close with light operation becomes a viable way to minimise labour, and improve egg production.
Wake the birds up a little before first light, and the birds will eat more concentrates, increasing egg production, and also lay eggs before leaving the shed, minimizing losses from eggs laid outside. I regard the correct nests as essential to any shed, after all eggs are what we are about, so start from the nests and work out. We see a lot of people who come in for advice, and they say something like this.” I have built a shed like this, these sizes with doors here and there, etc, etc “.
Instead, start from the highest priority, nests which are comfortable for the birds, easy to clean, easy to access, easy to collect the eggs and designed to make sure the eggs will be clean. Remember nests need to be sufficient so that all the birds desiring a nest can get one. The maximum pressure on the nests only lasts for a month to six weeks when the peak of lay occurs, and declines gradually after that time. But if the bird cannot get a nest when the egg is coming, the bird has limited retention capabilities, and once dropping eggs in other places than the nest starts, then floor eggs can go from nothing to 10 or 20% and its might hard to correct once it starts. 10% is the profit level of the operation, loose more eggs than that, either as complete losses or dirty downgrades, and its all red ink no matter what else you do.
3/ Egg processing
This includes washing, packing, storing. It’s the area where the mechanisation is quite expensive, and mostly an unplanned after-thought, though that is changing. Because anyone can put 12 eggs into a carton, it seems like its simple task. A cloth can wash off the odd spot of a clean egg, but multiply it by 100 or 200 or 300 dozen and suddenly it is a major time consumer. In addition, add poor nests, ageing flocks, and rain, and the simple task suddenly is a major time consumer because the eggs will also be dirtier.
Unfortunately, the costs of automation usually take people by surprise, and in the early days of the industry, were positively ignored by those talking up the entry to the industry. Newcomers were told not to worry about that part. The obsolescence of much of the machinery of the 70’s and 80’s which placed a lot of small machines from the older cage farms at the disposal of the new free range farms made the resolution easier. However today, that source of machinery has gone. The new food laws mean egg handling is no longer a task for an old lean to out the back, but in itself a substantial expense in buildings. Good design is essential to meet all these regulations.
4/ Feed and water
These items are still major time consumers, and become prominent when numbers increase.
As shed density increases, there is a tendency to try to make the feed and water operate from a separate shed. The separation of the feed and water protects these from contamination particularly on multilevel perching systems. While this appears to be an advantage, the isolation of the feed and water is a detriment to the health and production of the bird, and the precocious early risers, early layers, the most productive birds in the flock, are held back. These high production birds want to eat and drink before others, lay eggs before others, and will leave the shed in search of food, and consequently increase the level of eggs laid outside of nests. The ideal is to allow the early birds to awake, rush to the nest and lay the early egg, then eat and drink. If the nests ate full, they eat and drink while waiting.
In addition the process of placing feed systems a long way from the nesting system, ensure that the birds increase the consumption of greens, but reduces the density of the diet and as the modern bird has a very small gut size and digestive capacity, reduces the amount of actual nutrient consumption, with resultant loss of production.
Water is essential as the birds in the summer early and late in order to avoid heat stress so placement of drinkers in the shed is important. Minimum maintenance, cool water, reliability, ease of bird access, sufficient space for the high pressure times, so maximum numbers can drink at the same time. Water temperature in both summer and winter is important, as is the method of supply to the house, between .25 and .5 litres of water per bird per day, itself a design problem with mobile houses.
Nipples lines do this best, but often the space needed and protection from manure are difficult. Numerous systems are available and just about as many ways of using the systems have been tried. Bell drinkers are a viable option in low density sheds.
But the key design is not amount of trough space per bird which is often mentioned in the older books. It is in fact the distance the birds need to travel to water and to food (and to a nest) that matters.
The ideal is that any bird should be able to get to food, water and nest without being challenged by another bird. The peck order of the birds determines the challenge. Though much debated, the domestic fowl can remember about 12 other birds. If a bird meets number 13, they will have a squabble to find who the dominant is and who is submissive. The lower 10 or 15% of the birds will run rather than squabble, but of course these timid birds with be permanently deprived of optimum nutrient levels, and so the performance is below par.
When the birds have squabbles, then know who they are in that relationship, but forget another relationship previously established.
One of the most obvious effects of peck order is at dusk, with multi level perches. You can often hear the birds squabbling from the other side of the farm. The noise level is remarkable compared with perching at a single level. On the same level the birds perch in there little sub groupings, where with multi level, the birds all try to migrate to the highest level, disrupting the peck order, so two forces come into play, the desire for the safest highest perch, and the desire to be next to your own peck order group. So every evening there is a re-sort of the peck order.
Design and options for Feed systems
The same sort of design rules apply to feed, its not trough space but feed availability without challenge, that allows uniformity of feed consumption, minimizes stress, and increases production. A rule of thumb is 1kg feed per bird per week is required. These days, the light bodyweight of the bird and the high densities of the feed needed to compensate for the high volumes of fibre mean that the actual is lower say 600 to 800 grams per week, but the losses by wild birds often balances the formula back to the 1kg per week.
The feed systems have many components, and many ways of achieving good outcomes.
The use of mobile sheds tends to limit feed systems as power availability is often limited, the ideal system will have to handle this problem. Solar is a possibility, but still at present the size of the batteries and inverters necessary to start common feed drive motors is a problem, mainly financial.
The main feeder systems available are:
Flat chain feeders
These are an on demand system which circulates feed on a wide chain in a loop around the shed. They usually are operated on a timer to keep the chain full so feed is available at all times, or at least during daylight hours. Therefore they need power all day. It is usual to have a hopper in the chain loop, holding up to several 100kg of feed, and fed from a silo with yet another motor. Advantage good feed distribution, robust, disadvantage is less flexible for extensions, large hopper presents a point load in a mobile shed, power hungry requiring large start currents for the motors and is considered a timed operation.
A flat chain system usually consists of:
- Feed trough usually 100mm wide and 3 metre sections
- Legs or suspension for the trough allowing height adjustment
- Corners usually one per corner, as the chain is not suited to going up and down
- The actual chain
- A drive motor and gearbox, sometimes combined with a distribution hopper usually in the range of 100-500kg
- A timer to operate the system
- Power system
- The distribution hopper usually has an adjustment to ensure the system will fill the trough to a desired level
- A fill system to keep the distribution hopper full, often a motor driven auger lifting feed from a silo, but can be a silo mounted high enough to allow food to drop directly to the distribution hopper. The direct drop silo is preferable but often difficult to be placed to obtain the required result.
Pan feed systems
These use a centreless auger to move feed along a straight tube from the distribution hopper and dropping feed into pans spaced along the auger pipe. The first pan fills then the feed is carried on to the next, and so on until all the pans are full. The feed is pulled from the small distribution hopper usually holding 50 to 100kg, towards the drive motor. The feed motor runs until the last pan, the one nearest the drive motor, called the control pan, which switches off the motor when it is full.
Another motor auger fills the distribution hopper from another silo whenever the distribution hopper is empty.
Each pan usually holds 1-5 kg of feed, and the usual design is one pan per 25 to fifty birds, usually spaced 3 to each meter of shed length, allowing for the requirement to minimize the challenge between birds. To do this the feed auger will run a number of times each day to keep the pans full, usually between 2 and 5 times per day for about 20 minutes per time. Disadvantage is power is required to run the system on demand and usually two motors are required.
The relatively small supply hoppers requires an external silo or bin, and usually two lines are required to ensure even distribution of feed (remember access to feed without challenge). It is also a more difficult process to extend as auger needs to be replaced or re-welded, and installation requires quite specific skills and can be dangerous. Pan feeders need also to be on a height adjustable system usually a winch but often adjustable wire rope suspending the system from the roof. This is to minimise feed wastage and allow for the differences in bird height between breeds, and ages of birds.
Components are, drive unit, distribution hopper, and centerless auger, feed pipe with pans, suspension system for height adjustment, control system, cross filling system and silo, power supply.
Cable feed system
The cable feed system is used to form a loop around the shed in distinction to the auger pan feed system which has straight lines.
Cable feed systems can be used two ways. One way is to have the cable loop running through a pipe with feed pans on the pipe. The system will then run as an “on demand system”, but the design of the loop and the ability to change heights with careful use of corners means a separate sub hopper is not needed, as the system can load straight from the silo. However, such a system has a difficulty, as do all silo systems that the silo needs to be disconnected when the shed needs to be moved. The ability to have multi heights allows for creative thinking in the placement of a distribution hopper which can be a direct drop from a larger silo, making the disconnection issue less important.
Components, cable with disks, drive unit, distribution hopper, silo, conveyor pipes, corners, feed pans, control system.
The other way is to use the cable system as a fill system. This means the loop runs around the shed near the roof and has drop pipes which fill separate feeders at bird level. The hoppers can have a significant volume, as well as the volume in the drop pipes. The feeders can also be individually height adjusted to compensate for locations in the shed, or the age, or breed of birds. The advantage is that the volume of feed in the shed may be set up to hold up to a weeks feed. If 40 kg hoppers are used say at 1 per 50 birds, it would only need to be filled once per week. This means a system like this could be used from a portable generator, running for less than 1 hour per week for a 500 bird shed, allowing a mobile field bin to be used instead of a silo, allowing simpler structures for the mobile shed. Some care is needed in the selected features in order to ensure operation, but this system offers useful features for larger size mobile houses, where power may be a limiting factor.
Components are cable with disks, drive unit, distribution hopper, conveyor pipe, drops often with shutoffs, feed hoppers with storage, corners, and electrical control, silo or portable silo, generator or power source.
Poultry Signals books