
Incubation
Incubation is the incubator enabling the wonderful process of a chick embryo developing in an incubator and hatching, and it all occurs in a few short weeks!
There are different types of incubators such as the Bellsouth 100 egg incubator which falls into the ‘still air’ category and doesn’t require a fan where forced draught types such as the Rcom incubators have fan/s to enable movement of warmed air and humidity around the inside of the incubator.
The hints and tips below will assist in getting the most out of your incubator. Some of these tips are also located in Bellsouth’s free app Hatchabatch
Candling
Incubation is often viewed as a mysterious process, at least in part because the growth process is occurring ‘behind closed doors’ inside the egg shell. The ability to see, in part, the development of the chick in the egg helps us understand the growth process and helps improve our incubation results. The process of viewing the internal contents of the egg shell is called candling. This name came from the use of candles as a light source in the early days of incubation. Candling is a simple process. It involves using a light beam and allowing the light to penetrate the shell and illuminate the inside of the egg. Candlers vary for the simple wooden box as illustrated below, to the intermediate type of assembly with a light and pre-made box, to the sophisticated, light controlled, lens focused arrangements. For most of us, the simpler units are quite adequate.
What can be learned using a candler?
- The state of freshness of the egg
- The quality of the egg shell before setting.
- The level of development of the embryo during incubation.
- Early incubation failures, and infertile eggs.
- Moisture control in the incubator.
How To Candle
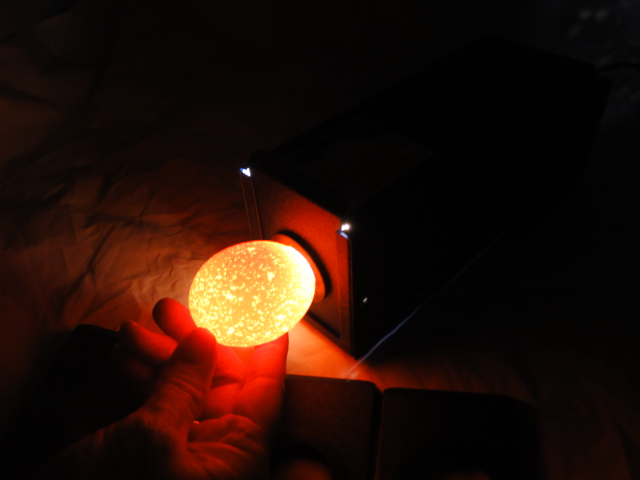
Eggs are best candled in a darkened room so that the inside of the egg is better illuminated. Hold the large end of the egg against the light beam so that the light only comes through the egg. Now look sideways at the broad sides of the egg. Do not look towards the light through the narrow end of the egg. Rotate the egg so that all the contents may be viewed.
Figure 1.
What Can You See By Candling?
State of freshness of the egg. The size of the air cell at setting is very important. If the egg has dried more that its quota of moisture loss pre-hatch, then the chicks will be struggling to hatch at all. The illustration in Figure 2 demonstrates what the air cell looks like after different storage times.
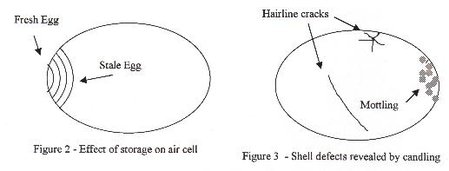
State of the shell. Many disease including infectious bronchitis, can cause discoloration and some damage to the shell. When illuminated during candling, shell faults become apparent. Eggs with these faults should not be set, as they are known to have poor hatchability. Shell faults include mottling, hairline cracks and chalkiness. See Figure 3.
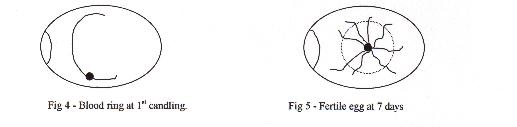
Development of the embryo. With the high powered, lens focused candlers, the development of the embryo can be seen from 24 hours onwards. With the simple ‘light in a box,’ embryo developments are usually visible from about 3-4 days. By one week, the spidery blood vessels are very obvious. See Figure 5.
Moisture control. During the incubation process the egg will lose an average of 13% of its weight as moisture loss. The limits of this loss are a minimum of 11%, and a maximum of 15% (chickens, ducks and geese.) Insufficient weight loss will mean wet and sticky chicks, with a possibly delayed hatch. Too much weight loss will result in small, noisy chicks, with increased post hatch mortality. Moisture loss of 13% will mean that around 30% of the egg volume will be air cell by the 18th day. By watching the development of the air cell and monitoring the weight we have an extremely accurate method of relating air cell growth, humidity readings in the incubator, and weight loss.
Weighing is not essential but certainly helpful with difficult species, or where accurate information is not available about a certain species. An application of this is ostrich incubation.
When Is It Best To Candle?
I recommend that candling be done four times during the incubation process. The first time is prior to setting the eggs. This enables the observation of the freshness of the eggs, which relates to the storage conditions and the removal of any with faults. The second time is after one week. This will indicate the infertile or clear eggs, and will give the first humidity indication. The third candling is after two weeks. This will give a good idea of the continued development, and the critical moisture indicator. This is the last chance for humidity adjustment. The fourth time is at the transfer to hatcher or the last turn on the 18th day for chicken eggs. For other species, candle about three days before due hatch date. This candle will indicate that the humidity has been correct and that all is well. Usually by this time, the adjustment of the humidity will have little bearing on the end result. If the egg is too dry, then little can be done to help. If it is too wet then a couple of days at low humidity may correct the situation, but probably not. Humidity in the incubator for the last three days is usually set for maximum so as to avoid drying just as the chicks are hatching. This is mainly necessary in forced draught incubators. The fourth candling is usually used to confirm the decisions made in earlier candling. If the situation is incorrect, make notes so that you will be able to remember what to do next time. The main thing to remember about candling is that it is used to build an experience factor. Don’t expect to understand all there is to know the first time. After you have done it a few times, you will be able to cross compare what you are seeing and have the ability to make adjustments because of it. After a little while, you will see the eggs that are different and be able to tell a good one from a dud. Another thing to consider is to always candle at the same time each batch. If you candle one lot on the 7th, one on the 5th, and one on the 8th, you are always looking at different stages, and the ability to see the pattern of growth is more difficult to discern. If you always do it on the same days, then you only have four stages to remember.
Notes For Other Species
The best time to candle any species is on a weekly basis. This will mean quail are only candled twice, and ostrich are candled five or six time. Routine is the important part, always candle on the same days to avoid confusion.
See also
Air Cell as the Humidity Indicator
During incubation, people are concerned with the humidity percentage number. Often, the internet or “So and So told me this is what is correct”. The trouble is , unless the source is using the same incubator, with the same eggs, and the same calibration, the “recommended” humidity figure may be at best irrelevant, or just plain wrong..
So let me explain why.
There is only one thing that matters with humidity and only the egg can tell you. So learning how to read the egg is the single most important thing you can learn about humidity. And its free! Hygrometers or wet bulbs are not required.
Basically, the egg needs to loose enough water by evaporation and respiration so that by 3 days before the egg is due to hatch the egg will be about 14% lighter in weight, or so it will be between 25% and 35% empty at the big end. So you can tell this by candling the egg with a torch, called a candler, or by using scales. The weight loss is indicative of the air cell growing in size in the egg.
Air Cell Development Chart
Viewing the egg contents during incubation is called candling. Candle chicken eggs every 7 days. Checking the air cell is the best indication that you are tracking well with humidity.
The air cell will be continuing to increase in size every 7 days and ought to be a third of the size of the egg by Day 18 (chicken eggs). If the air cell is not increasing in size, then there is too much moisture retained in the egg and you may have ‘dead in shell’ fully formed chicks. Candling with the air cell in mind will allow you to adjust your humidity as incubation progresses.
As the seasonal changes, change air temperature and ambient humidity during incubation, you may find this process is different with each incubation batch.
Example of a chicken egg below.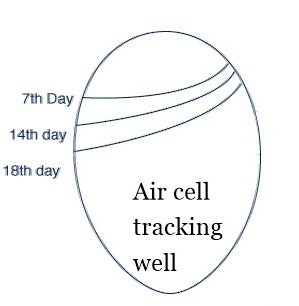
Understanding_Humidity_and_Humidity_Measurement_print version
Hygrometer_Wet and Dry Bulb Tables print version
Understanding Humidity and Measurement for Incubation
Two Types of Reading instruments:
- Wet Bulb and
- Electronic.
Two main different measurement standards: Wet Bulb Readings and Relative humidity readings. The figures are not interchangeable
Relative humidity is the most user friendly as it relates to the effect of the humidity. The effect of the humidity is to control the loss of moisture from the egg. The average humidity is what is important, not a spot reading.
Discussion
There are 2 common responses to auto humidity control. One is to say I will set it on auto and just forget about it, the machine will do the rest. The other is to suddenly become fanatical about precision, now we can read the humidity often, if it varies a couple of points something must be wrong. Both extremes may work for a while, but both will let us down in the long run. It is better we understand what the humidity does and then see to understand how to make it work for us.
Why have humidity in the incubator?
Humidity is important in the incubator as the correct humidity allows the correct respiration of the egg. It is important to allow the chick and the air cell to be the right size when the chick starts to hatch. If the humidity is too high or too low then the chick will grow all the way up to hatch and then die or get stuck in the shell. As far as small operators are concerned, the average humidity is all that is really important, so high humidity for a day is not significant, and or low humidity for a day is not significant if the end average is correct.
Measurement Standards
But there are now a number of ways to read humidity and understanding each method is important. It is also important to understand that there are three different measurement standards.
1/ Absolute Humidity is the physical amount of water per cubic metre of air, usually expressed as grams per cubic metre of air. For our purposes this is good to know but not useful for our application.
2/ Relative Humidity is derived from a comparison of how much moisture a cubic metre of air at a certain temperature could hold if it was saturated, that is held all the moisture possible, and the actual amount of moisture in the air at the time. So let us assume that a cubic metre of air at a certain temperature could hold 20 grams of moisture before it became saturated. Then this would be called 100% humidity at that temperature. If the same cubic metre of air at the same temperature had only 10 grams of moisture then the relative humidity would be 10/20 x 100=50% Relative humidity. Now this is really important. Relative humidity gives us a measure of the effect of the moisture in the air.
To understand what this feels like. Take a room that is 20 degrees of thermometer temperature, and 50% relative humidity. I will usually feel comfortable if this was my house. If it was 90% at 20 degrees we will feel quite hot, and uncomfortable. Alternatively 20 degrees and 10% humidity I would will make you feel quite cold. The different levels of moisture effect how we feel. It is a measure of the effect of the moisture in the air.
So we want to get a good idea what the relative humidity is, because that is what has the effect on our eggs.
Reading Methods: Wet Bulb Thermometer
Historically, the most common method of reading humidity has been using a wet bulb thermometer. This is essentially a standard thermometer, which has a “wick” or cotton sock over the bulb at its bottom. The thermometer without the wick would read the same as the standard dry bulb thermometer. However, when the wet wick is placed over the bulb, the thermometer now reads differently. The water evaporating from the wick cools down the thermometer bulb so it now reads lower than the standard thermometer. The amount of cooling is dependent on the amount of water in the air of the incubator. If the air is very dry, a lot of water evaporates, so the thermometer reads a lot lower than the standard thermometer. If there is a lot of water in the air, not much evaporates off the wick, so there is not much cooling, so the thermometer reads almost the same as the standard thermometer. This is called the wet bulb depression. The difference between the standard thermometer and the wet thermometer directly relates to the humidity in a special chart called a psychometric chart. So we can use this to calculate the relative humidity which is what the digital controls read. In fact this is a common way of calibrating the digital control for humidity. The only real factors which effect the efficiency of the wet bulb system is the purity of the water, distilled is best, the cleanliness of the wick, and the structure of the glass, which for our purpose is considered not to change. The Wet bulb thermometer should be placed in the incubator at a place where there is good air flow, is not too close to the walls of the incubator, and can be read from the outside. The incubator should be closed for about an hour to allow the humidity and temperature in the machine to stabilize.
Two types of reading are available from a wet bulb:
One is the actual wet bulb reading, which must be compared to the dry temperature reading. For instance, if the incubator is running at 100 degree F, a very common temp for chickens, and the wet thermometer reads 84 that represents one humidity, but if the temperature is 102 degree F say for quail, then 84 degree F is a different humidity level.
The other way is to generate a relative humidity reading. This involves taking the dry temperature of the incubator and the wet bulb reading, and putting them into a RH chart, like this one.
First, find the dry temperature on the bottom of the chart, then find the wet bulb reading on the right hand curved line, follow the grid lines until the two intersect, and read off the humidity from the curved lines.
The first think you will see from using this chart, is that there is some judgement involved in reading the chart.
Secondly, a small change in one of the input reading makes a considerable change in the RH from the chart. So at best the reading accuracy of this system is about 1-2%.. Changing the input reading from either thermometer 1 degree makes about 3% difference in the RH. So we need to understand the limitation of the instrument.
Some charts use the dry temperature and the wet Bulb Depression. If we subtract the wet reading from the dry reading then we get Wet Bulb Depression So 100 degrees Dry-84 degrees wet gives 16 degrees Wet Bulb Depression.
However this reading can be a problem. It’s the method used in most of the books on incubation, and tends to be regarded as an absolute. As you can see the humidity can have the same wet reading but be very different, if it is not compared with the dry temperature.
The other reading methods is using an electronic humidity gauge. This is becoming more regular today as the quality and accuracy of humidity probes improves. 10 years ago a reading from costing $100.00 was worthless, but 10 such instruments and get a range of readings plus or minus 15 %. Today a $50.00 instrument at new may be +/-5% accurate quite accurate enough for incubation work. However the sensing elements are very susceptible to drift, dirt and chemicals. So it is necessary to check calibration to be sure of accuracy. Most popular humidity probes do not have an ability to match the reading to a reference instrument. Industry accuracy probes still cost in the region of $1000.00
To test the calibration of an electronic gauge use a wet bulb thermometer, dry bulb thermometer, and RH electronic gauge, all in the same part of the incubator, as close as practical to each other without touching. Allow the machine to be closed for at least on hour before taking readings. Read all three instruments at the same time and write down the readings. Using the RH chart, calculate the RH reading from the dry bulb and wet bulb readings. Compare the two. The wet bulb reading is the more accurate reading as it has fewer factors which can change.
So what incubator humidity is right? “I read this in a book,” or “I saw it on the internet “, or “So and So told me this is what is correct”. The trouble is, unless the information source is using the same incubator, with the same eggs, and the same calibration, the “recommended” humidity figure may be at best irrelevant, or just plain wrong.
So let me explain why.
There is only one thing that matters with humidity. Only the egg can tell you. So learning how to read the egg is the single most important thing you can learn about humidity.
The egg needs to lose enough water by evaporation and respiration so that by 3 days before the egg is due to hatch the egg will be about 14% lighter in weight. This can be seen another way by candling the egg. If the humidity on average has been correct, the air cell in the big end of the egg will be between 25% and 35% of the egg. That’s a lot of empty egg. But the chick needs this space to breathe and to get out of the shell. So you can tell this by candling the egg with a torch, called a candler, or by using scales.
So what effects how much water evaporates out of the egg? (we cannot effectively control the respiration, the chick is doing that)
Two things; the structure of the shell, and the humidity of the incubator. Because each species has a different shell structure, generally the humidity needed is related to the specific species being incubated. This is also a compromise when we want to do several species at the same time in the same incubator.
So now we are back to the actual humidity. But the actual humidity will depend on what sources of information I have.
But are the existing books and information sources correct? I usually say no, and this is why.
1/ It can be is a bit difficult to read the fancy charts so sometimes you can read them wrongly.
So the advice may be arrived at by wrong use of the charts.
2/ The advice is given by someone incubating eggs which may be very different to the shell structure of your eggs, due to genetics, diet, or age.
3/ The advice may well be from a different era. Lots of the methods from 30 years ago are now recognised as being based on a wrong understanding of the eggs.
4/ The advice may be based on incubators with different humidity systems. Most existing incubators use what I call static humidity systems. That is you put water into a container, and then cover or uncover the container until you get a humidity reading which gives the correct weight loss or air cell size. This is ok, but we need to be reminded that the average humidity is all that matters. With a static system, the humidity in the incubator is the combination of the ambient humidity in the room, which may go up and down, plus the water evaporated from the eggs, plus the humidity added to the incubator from the evaporation of the water container. Now if I read the humidity in the afternoon, I will read a higher humidity than if I do it at 4am. So which reading is right? Calculating the average is somewhat difficult. If the operator is consistent, then he will adjust the humidity to achieve the right weight loss.
Also, if the machine is manual turn or semi-automatic turn, then every time the incubator is opened, the humidity will escape. It will take an average machine 2-4 hours to get the humidity back to balance. If I do this 3 times a day then for a lot of the day the humidity will effectively be low, even though the temperature in the machine recovers quickly.
In the Automatic humidity machines, the control instrument is set for a particular humidity level. The control then actively adds water by evaporation to the incubator, or allows the humidity to fall as the fresh air comes into the incubator. If the outside humidity goes up, then the control doesn’t add any more moisture, but allows it to fall to the “Set Humidity”. If the outside humidity goes down the machine adds moisture, to bring it up to the set humidity. If I open the lid the machine actively adds extra moisture to quickly recover to the set figure. The result is the average humidity is the same as the reading. We can then change the setting if our eggs do not respond with the correct weight loss.
We have seen a lot of humidity figures quoted which are way above the real average figure, and these have caused a lot of confusion. A rule of thumb we have found is that the fully automatic incubators like the R-Com run 5-10% lower than the book recommendations based on the old technology incubators. So if your book says 60% start at 50%.
REMEMBER, it is easier to slow down the humidity loss by simply running high humidity, however it is very difficult if you get 2/3 of the way through and need to lose more weight. It’s much harder to correct.
See also
See Bellsouth YouTube channel
Incubator, Hatcher, and Brooder Definitions
What is the difference between an Incubator, a Hatcher, and a Brooder?
The terms incubators, hatchers and brooders, can mean different things to different people or in different industries. For example, what we call a brooder (or an ICU) is often called an “incubator” in the medical profession or what we call a hatcher might be understood as performing all the same functions of an incubator, which is does not. So here is an explanation of the different terms and what we, at Bellsouth, mean by them.
Incubator
This is the word we use the most often and it is for developing fertilised eggs until they hatch*. The three main things an egg incubator can control are; temperature, humidity and turning of the eggs. (Ventilation is often control manually by air vents).
Some egg incubators only control temperature and require manual turning and humidity whilst others will control all three but human observation is still essential. There’s no such thing as a set-and-forget incubator and even if the perfect conditions are maintained by the incubator, there’s still no guarantee of chicks hatching, it just gives the best possible chance.
In a nutshell, an egg incubator is designed to incubate a fertilised egg until the chick hatches (with the exception of cabinet incubators, see below).
Hatcher
Hatchers are best defined by what they are not, and they are not incubators. They are only used for the last three days of incubation, sometimes called the “lockdown” period. Hatchers are required if a cabinet incubator is being used as you cannot hatch eggs in them due to the messy nature of hatching. For this reason, some people choose to use a hatcher for smaller batches as it makes it easier to keep the incubator clean.
Some people get the impression that a hatcher is simply a cheaper incubator will all the same functions; it’s not. Hatchers can only be used during the last three days of incubation.
Brooder
A brooder is used for live animals only, not eggs. A brooder can be as simple as a heat lamp above a small flock of new born chicks or it can be an ICU Brooder with temperature and humidity controls and even nebuliser capability. We call it a brooder to differentiate it from the incubators even though, in medical circles, they might call it an “incubator”
In summary, an incubator is for incubating an egg from start to finish, a hatcher is used for the last three days of incubation only, and a brooder is for live animals, not eggs.
Why Do Broodies Hatch Better Than Incubators_print version
Why Do Broodies Hatch Better Than Incubators?
Many people falsely blame the incubator here but this may well not be the case.
If your incubator performs as per the manufacturer’s instructions, holding a constant temperature without more than 1 degree Fahrenheit of temperature difference between off and on, and with somewhere near the correct humidity, then the most likely cause of the problem is the breeder nutrition. This may also be the cause of low hatchability, especially if there is a high incidence of fully formed chicks which died just before hatching, or piped and then couldn’t get out.
But why should this difference occur, surely the incubator must be at fault if it doesn’t perform as well as the broody?
This is a question (and a problem) we handle almost daily in the lead up to spring. We must sometimes like a salesman who either wants to sell a lot of vitamins or don’t want to take the blame for faulty machinery. Sad to say there are some and have been many who do just that.
Back to our problem Why is it so? The fact of the matter is that there is no such thing as an incubator which will perform as well as a broody hen of the species being incubated. I will qualify that by saying a broody hen which is healthy, in good condition, louse free and in a good nesting site.
All incubators fall short of the ideal set by our broody, though no-one fully understands why. Our incubators generally do not have as accurate a temperature control as the broody hen (some electronics now comes close) who regulates the temperature by shuffling the eggs in and out from under her, often as much as 100 times a day.
This movement also contributes to the broody’s success. The movement ensures that the embryo is moved around in the egg leaving the waste products behind and moving the embryo to fresh nutrients in the egg.
The movement of the broody is also quite gentle in contrast to some types of turning mechanisms or clumsy turners in manual machines.
In forced draught machines we also make the egg sit in a gale, albeit a hot gale, making it difficult for the embryo to do its job of regulating the egg moisture levels.
Well, this sounds good but why is all that important?
All this is important because it adds up to that bogie of modern man STRESS. On us when the results are not so good and on the embryo in the egg. If any of the required conditions for hatching are less then optimum, and I am saying that all of the physical conditions in our incubators are less than perfect, then these cause added stress on the embryo. This causes the embryo to use the stress fighting vitamins up more quickly than normal. This means that the reserves of these vitamins are used before the embryo needs them.
When does the embryo need them?
When the chick changes from breathing via the vein system in the egg to breathing via the lungs, the chick encounters the highest stress of the incubation period. Following this it must perform the strenuous task of removing the end of the shell. Both of these events cause the chick to use up large amounts of B group stress fighting vitamins. But if the reserves are already depleted then the chick will die. This usually happens at the time the embryo pushes its beak through the membrane into the air cell but can occur at the time of the first pip.
With the broody the extra rotation ensures that the vitamins are used most effectively, allowing eggs which are marginal to be hatched where those same eggs would be dead in shell in the incubator.
The Solution
The solution is simple and straightforward. Increase the levels of the B group stress fighting vitamins and the hatch rate will increase. Water soluble vitamin mixes fed in the water or feed for 2 weeks before collecting eggs for incubation will improve the results. This will also ensure stronger chicks and better liveability.
But, you may say the birds have good pellets and green feed isn’t that enough. The short answer is no. Pelleted rations are least cost formulated for high production, not for hatching. The amount of B group vitamins necessary for good hatch is a great deal higher than that necessary for high production.
Add to this the fact that the strains of modem fowl lay many more eggs than the wild bird, so the amount of green feed required to obtain the necessary vitamins is more than the digestive tract can process. The only way is to add concentrated vitamins to the food of the bird.
With species other than chicken, the commonly available rations leave a great deal to be desired. We know comparatively little of the nutritional requirements of species such as peafowl, some pheasants, quail and goose. For these species a broader vitamin mix than the standard stress mix can produce exceptional results. Often the amino acid blend supplements are best.
In summary, the incubation problem you may be experiencing may not be the incubator. About 70% of all incubator problems we encounter (apart from outright component failure) are nutritional problems.
Bellsouth for Vitamins
Watch the Poultry CRC YouTube clip on chicken embryo development (this is an external Australian website).
Anatomy of the Chicken from Poultry Hub (external Australian website)
Poultry Hub, Poultry resources for teachers (external Australian website)
Virtual Chicken demonstration (Auburn University, USA website)
Get the most out of your Bellsouth 100 incubator_print version
What is a manual turn incubator?
What is a semi automatic incubator?
Can I buy a Bellsouth 100 manual turn and upgrade it to semi automatic or fully automatic?
Should I place the incubator on a piece of carpet or a towel because the bench seems cold?
Should I place a towel over the incubator so it keeps its temperature in the winter?
Help, I have received a notice that my power will be off for a few hours when my incubator is on – what do I do?
Can I mix up 2 different eggs in the incubator? I have heard you can do it in some incubators.
There is no fan in the Bellsouth 100 incubator. I have read on the internet polystyrene incubators need a fan?
Bellsouth 100 incubator turning mode terms
- Manual egg turning (must lift the lid of incubator to hand turn eggs). Holds up to 100 average chicken eggs.
- Semi automatic egg turner (uses a push/pull rod to manually turn eggs, however there is no need to open lid of incubator for turning). Turning rod with dividers reduces egg capacity of incubator to 50 average sized chickens eggs.
- Automatic egg turner (once plugged in and set up correctly, turns eggs approximately every 1.5 hours).
Installing the U shaped clip onto Bellsouth 100 incubator automatic turner
The metal U shaped clip ensures the auto turner stays in position and once in place reduces ‘bounce’ and movement of turning eggs.
Slide the U shaped metal clip over the end piece, with the bottom tongue under the perforated mesh floor. The curved section of the clip should be to the top.

B100 U shaped clip
Slide the clip on until the back of the clip is against the end piece.
Place the assembled frame and perforated metal, mesh floor into the incubator base. Remove black bung from the control end of the incubator base.
U shaped clip B100
Place the auto turner so the cog gear teeth are sitting in plastic track.
Ensure auto turner end frame is secure.
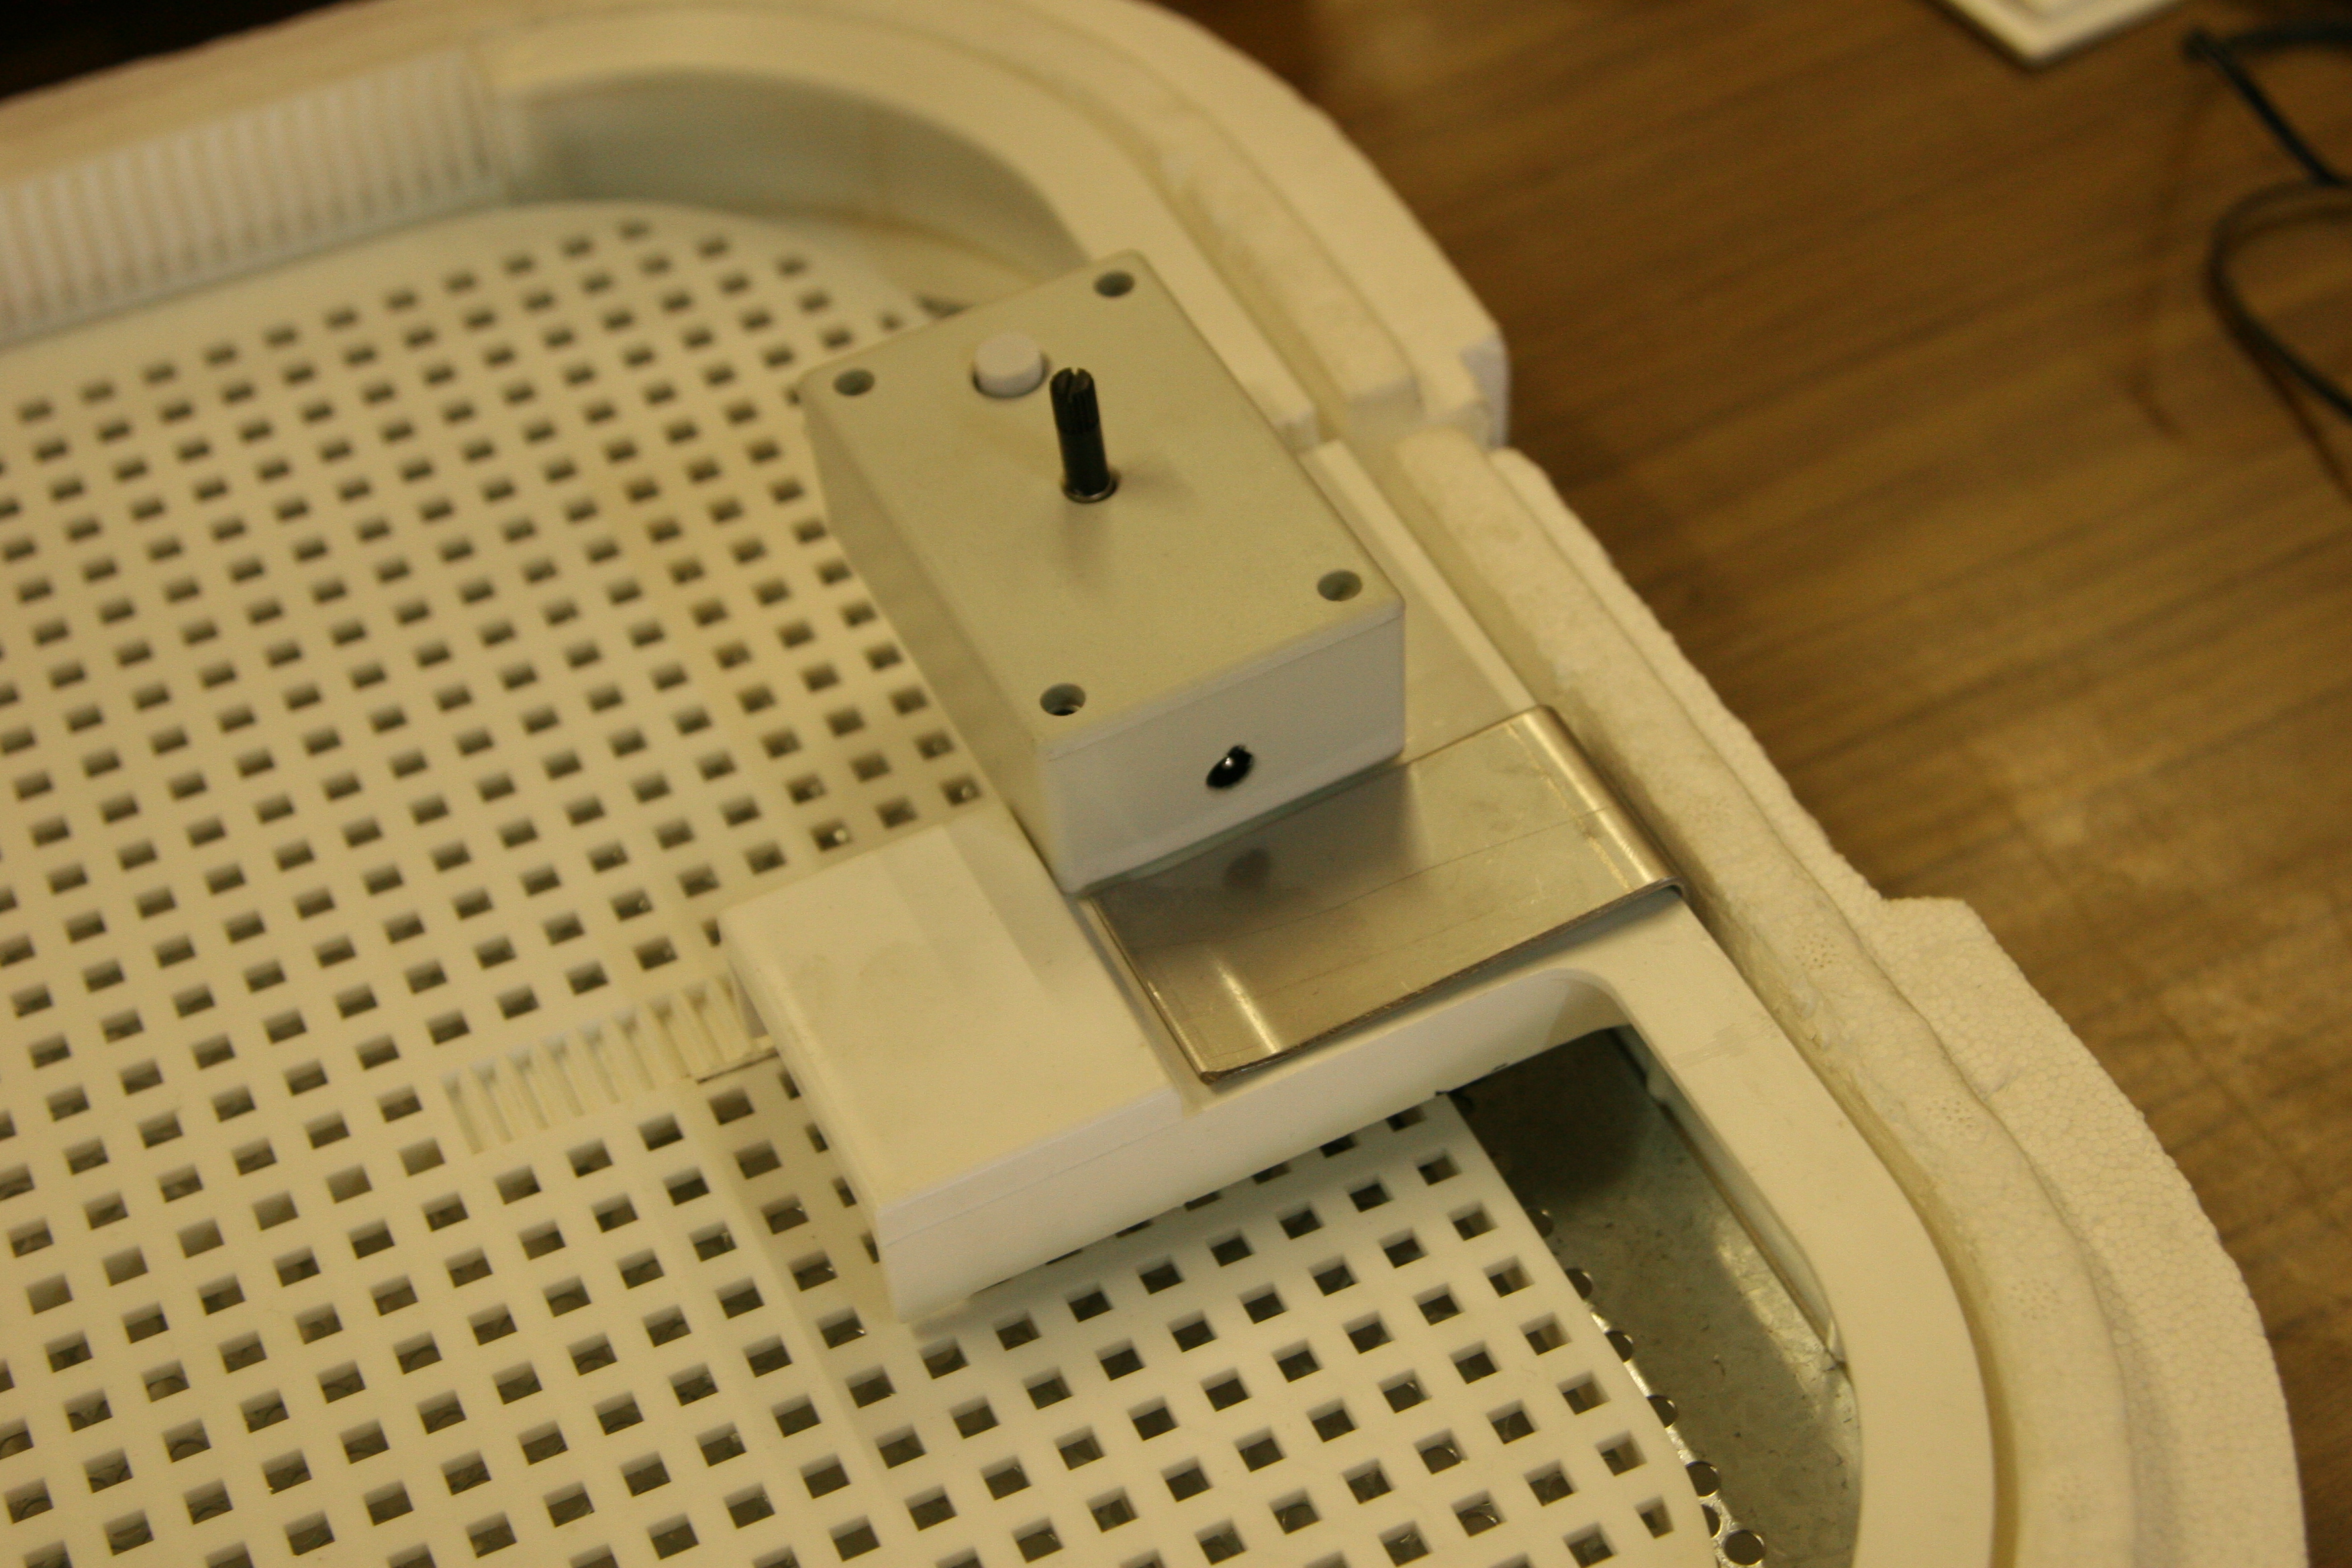
B100 U shaped clip
Installing U shaped clip pdf print version
How can I change the egg turning capability in my existing Bellsouth 100 incubator?
- Manual to Semi automatic – must have perforated mesh, metal floor (not wire) and purchase Semi automatic turner
- Manual to Automatic – must have perforated mesh, metal floor (not wire) and purchase complete Automatic turner
- Semi automatic to Automatic – must have perforated mesh, metal floor (not wire) and plastic floor must have cog tread, so you only need to purchase Automatic turner end piece only. If you don’t have the plastic floor with cog tread purchase the Auto turner gearbox kit as your semi automatic already has plastic frame and dividers.
Some early reflections and approaches on incubation in Australia amidst other articles from this Bellsouth Newsletter from the early 90’s.
Incubator products here
Testing a spirit thermometer for accuracy thermometer test oil based
Multiquip tray assembly for older Multiquip Multiquip_incubator trays
Microswitch (new style) for older style Multiquip guide
Bellsouth 100 Tough and Tropical information (old) B100 incubator Tough and Tropical